


What three really important things do plants need to grow?
sunlight, water, air
Do you remember learning about living and non-living things? We said that almost all things on earth are either living or non-living. The plants and animals that are living need to carry out the seven life processes - do you still remember what they are?
Plants make all the food that all the animals on Earth need to stay alive. If all the plants were to suddenly vanish, life on Earth would be not be possible. We need to take care of the plants on our planet because they take care of us.
In this section we are going to learn specifically what makes plants grow and keeps them alive. We will also look at growing new plants and how you can make sure that as many of your seeds as possible grow into healthy plants.
After the activity when you planted a bean seed, how did your bean grow - did it die or did it stay alive? Discuss what you think your bean plant will need to stay alive and continue growing.
Plants need sunlight, water and air to grow.
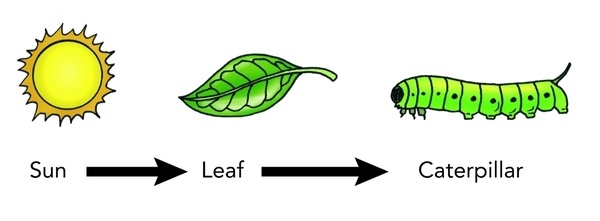
Sunlight
Air
Just like animals and people, plants also need air to live and grow. Plants use carbon dioxide to make food so that they can grow.
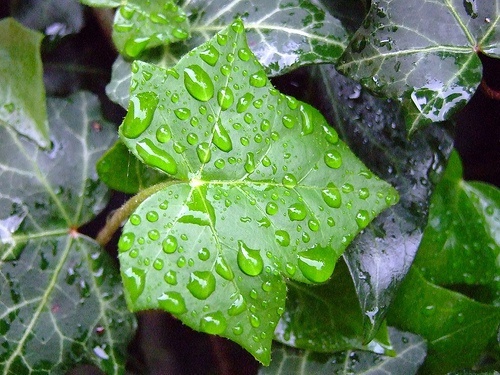
Water
Plants need water to grow and to make food. Some plants need more water than others. The amount of water a plant needs depends on the type of plant. If the plant does not get the amount of water it needs it will die. Some plants are able to grow in very dry areas, such as cacti in the desert. These plants have adapted (changed) over many, many years to be able to survive in these conditions.
The roots of the plant absorb water from the soil. This water carries nutrients from the soil to all the parts of the plant. In the picture, the raindrops are collecting on the leaves. They will then fall down to the ground and soak into the soil. The roots will then absorb the water for the plant.
Remember: a plant needs water, sunlight and carbon dioxide to make food.
Soil
Most plants grow well if they are planted in soil.
Plants can generally be grown from seeds or cuttings.
What three really important things do plants need to grow?
sunlight, water, air
Do you remember that one of the life processes is reproduction? How do plants make new plants?
They make seeds which then germinate to grow into a new plant.
How to introduce the topic
It is recommended to do this practical task over time at school while learners engage with the next section. Give the learners the opportunity to observe the wonder of a new plant becoming alive from a seed or cutting! Let them DO the investigations; observe and record observations over time.
Presentation hints
The correct labels must be used in the correct place.
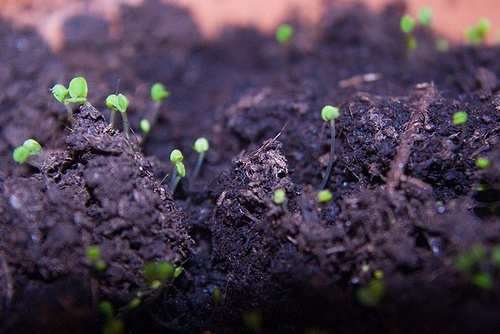
You have learnt that seeds are important to grow new plants. A plant needs to germinate from the seed to start growing. This means that the seed has to develop into a new plant and grow all the necessary plant parts.
In the first chapter of this term, we germinated a seed and saw that although it seemed to be non-living, it can be revived.
Have you ever wondered what seeds need to germinate and grow into new plants? Let's find out by doing a scientific investigation!
This is the first time learners will be doing a scientific investigation. Emphasise the need for a proper scientific investigation to answer a question, such as "Can a bean germinate in a dark place?", "Can a bean germinate in a very cold place?", "Can a bean germinate without water?", etc. Each group can answer a different question and their aim and prediction will depend on what question they are answering.
You will be working in groups. Each group will investigate a different question. Your aim and prediction will depend on the question you want to answer in your investigation!
AIM:
An aim in a science investigation is where we state what the purpose (aim) of the investigation is. What do you want to find out by doing this investigation?
Group dependent answer. For example: To find out whether a seed needs light to germinate and grow", or "To find out whether a seed needs warmth to germinate and grow"
PREDICTION:
A prediction is when you predict (make a guess) what the result of your investigation will be. But it is not just any guess! You must think about what you expect will happen in your investigation. What do you think will happen to your seed and how will it change?
Group dependent answer
APPARATUS (Equipment you will need):
METHOD (what you must do):
Each group will have a slightly different method depending on what question they are investigating. Follow the instructions for your group.
Group - Control
NB! A control is where the bean seed is given everything that we think it needs to germinate. In the other investigations, one of these things will be left out.
It is important to have a control to compare the other groups to. The control beans should germinate and grow the best and you can then use these plants to monitor further. Once they have germinated, show learners how to measure the lengths of the stems using a ruler. Possibly measure 3 stems and then calculate an average. Record these results on the board and then use them to draw a table and then a graph in the learners book. Get all learners to make a drawing of the first beans that germinated, and again when a leaf appears. there is space later on to do these drawings.
Group - No water
Group - No warmth
RESULTS AND OBSERVATIONS (What you observed and found out):
For this section, collect all the results from all groups. A suggestion is to have "the diary" written up as a table on the board and each day you record the results for each group. The groups must look at all the different investigations taking place, otherwise those who are studying, for example, the beans with no water will have a boring time. The skills of observation are very important here. You can teach some of these skills about how to collect and record data. The plants in the control group should be measured each day, once they have germinated so you can record the growth. Measure the length of three stems and calculate an average using, average = total length of 3 stems/3. You can then use these results to plot a graph to show growth over time.
Record the results from each group in the table below.
|
Control |
No water |
No warmth |
|
|
Was there a change on Day 1? |
|||
|
Did the seeds germinate? |
|||
|
When did the seeds first germinate? |
|||
|
Did the new plants grow once they had germinated? |
Now let's focus on the data we collected from the Control Group so we can see how the plants grew over time.
In the box below, make a drawing of a bean that has just started to germinate and of the first root that appeared.
The drawing and labelling must be done scientifically. The teacher must go through / revise / reinforce this from the previous section on this:
The correct labels must be used in the correct place
In the box below, make a drawing of the the plants that had grown further. Include the bean, the root and the first leaf in the drawing.
Same guidelines as for previous drawing
Use the space below to draw a table where you record the data you collected from the Control Group and the length of the stems each day after they germinated. A table is very useful in science investigations to record and present a lot of data. A table must also have a heading!
A possible outline of a table is given below. Depending on how much the beans grew, use millimetres or centimetres and include the unit of measurement in the column heading. Remember to give the table a heading! Also explain to learners why you have not recorded all the lengths of the stems, but only an average. This may be difficult at this point but it is an important science concept for later. Averages are used as they give a better representation of the whole experiment (or population). If you only chose one plant to measure, that plant might have not grown much or grown much more than the other plants and so this would not be a true reflection of the results.
|
Date |
Average length of stems (mm) |
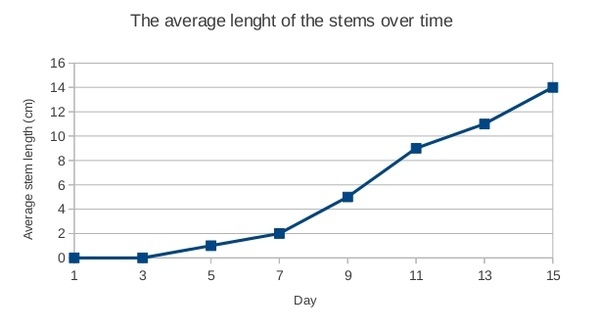
We are now going to draw a graph! Graphs are another way of presenting (showing) our results. They are often used by scientists to show their results. Drawing graphs is a very important skill! We will use the results from the table above to draw a graph. There are also many different types of graphs, but we will draw a line graph to show the growth of the seedlings each day. If this is the first time you are drawing a graph, do not worry! Your teacher will help you.
Take learners step by step through the process of drawing a line graph. Use the steps below and draw the graph on the board for learners to see what you are doing and then draw their own in their books.
CONCLUSION (What we have learnt):
When we do a scientific investigation, we always have to write a conclusion at the end. This summarises what we have learnt from the results of our experiment. From this science investigation, write a conclusion where you state what you have learnt.
Seeds need water and warmth to germinate (this should be the main conclusion from learners). Evaluate any other conclusions that they might have made depending on the experiment.
Presentation hints
The investigation below provides a wonderful opportunity to revise the scientific investigative process.
Planning the investigation:
Do the investigation:
This can be done as an extension investigation if time permits in your class.
AIM (What you want to find out):
What do you want to find out by doing this investigation.
Learner dependent answer
PREDICTION (What you think will happen):
Can you already guess what will happen in your investigation? Write a prediction of what you think will happen.
Learner dependent answer
APPARATUS (Equipment you will need):
METHOD (What you must do):
1. Fill the three containers with exactly the same amount of soil.
2. Plant the three seedlings in the three containers.
3. Place the three containers next to each other in a spot that gets enough sunlight during the day.
4. Label the three containers as follows:
5. Water the plants according to the labels.
6. Measure the three plants on the same day every week.
7. Record your findings in the table. That means you need to write the lengths of each plant in the correct block on the table below.
RESULTS (What happened?): (Answer dependent on classroom environment)
|
1- No water |
2- A little water |
3- Plenty of water |
|
|
Week 1 |
|||
|
Week 2 |
|||
|
Week 3 |
|||
|
Week 4 |
|||
|
Week 5 |
CONCLUSION (What we learnt):
What differences could you see between the three plants after the 5 weeks? Why do you think the plants differed so much after 5 weeks?
Learner dependent answer
Explain what germination means.
It means the seeds start growing and developing all the necessary parts.
What does a seed need to germinate?
Water, warmth and air.
What does a plant need to grow?
Water, food and air. Some plants need soil.
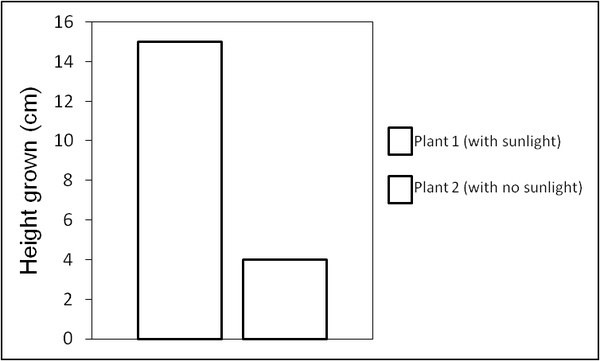
After two weeks the following measurements were taken:
|
Length of plant |
|
|
Plant 1 |
15 cm |
|
Plant 2 |
4cm |
Which plant do you think grew in the shadowy place? Why do you say so?
Plant 2. It did not grow very well.