How can we use the special properties of metals (magnetism, electrical conductivity and thermal conductivity) to our advantage?
Which additional properties of metals make them so suitable for use in items such as jewelry, coins, buildings, vehicles, furniture and utensils?
Introducing the unit
This unit addresses additional properties of metals, such as magnetic properties, conductivity and corrosion. One way of introducing this unit would be to have a conversation about magnets; this could include a demonstration of magnets attracting each other. You could ask students to name examples where magnets are used in everyday life (fridge magnets, magnetic cupboard doors, magnetic strips in the doors of fridges and freezers, magnetic toys, etc.). They could be asked to predict whether a metal object (a key for instance) would be attracted to a magnet, and this could be followed by a demonstration. The prediction could be repeated with a non-metal object such as a piece of chalk or plastic.
We have learnt that whenever we wish to make something new, we first have to decide what the purpose of that product will be. Since we are learning about Matter and Materials, let us assume that the product will be a tool or any other kind of object that will be doing a job for us. Once we have decided what the purpose of the object will be, we can choose a material with the right properties for the job.
Special properties of metals
In this chapter we will learn about some of the uses of metals. The properties of metals make them suitable materials for many different objects. We will soon investigate some special properties of metals that we have not thought about yet.
Metals and magnets
Have you ever played with magnets? Did you notice how magnets attract other magnets, and also certain metal objects?
In the next activity we will investigate magnetism and write our findings in a table.
Learning about magnetism
This investigation helps learners to discover that magnetism is a property unique to metals. Some metals are attracted to a magnet, but non-metals are generally not attracted to a magnet. One of the important misconceptions that learners have is that all metals are magnetic. The activity following this investigation will help them to discover that this is not true.
You should try to include at least one non-magnetic metallic object so that the learners discover that not all metals are attracted to a magnet. Aluminium (eg. kitchen foil), zinc or copper all fall in this category. The reason why South African copper coins are attracted to a magnet is because they are made of iron (which is attracted to a magnet), with a thin coating of copper on the outside.
MATERIALS:
Metal objects: coins, spoon, metal pencil sharpener, nail or screw, paper clip, thumb tack, pin, steel wool etc.
Non-metal objects: paper or cardboard, cotton wool, fabric, plastic spoon, cork, sponge, piece of chalk, small glass
Magnet
INSTRUCTIONS:
Sort the objects in front of you into two groups: metals on one side and non-metals on the other.
Write the names of all the metal objects in the column named "Metal objects" in the table below.
Write the names of all the non-metal objects in the column named "Non-metal objects" in the table below.
Hold each object close to the magnet to see if it is attracted to the magnet or not?
Write your observations in the table below.
Metal objects
Is the object attracted to the magnet? Answer YES or NO
Non-metal objects
Is the object attracted to the magnet? Answer YES or NO
QUESTIONS:
Use the information in your table to say decide whether the following statements are True or False. If the statement is true, you should draw a cross (X) in the 'TRUE' column; if the statement is false, you should draw a cross (X) in the 'FALSE' column.
Statement
TRUE
FALSE
All the metal objects are attracted to the magnet.
Some of the metal objects are attracted to the magnet.
Some of the metal objects are not attracted to the magnet.
Some of the non-metal objects are attracted to the magnet.
None of the non-metal objects are attracted to the magnet.
One of the Thunderbolt Kids on the front cover for Matter and Materials for this term is holding a magnet. Who is it and what is stuck on the magnet? What must these objects be made from to be attracted to the magnet?
Tom is holding a magnet with nails and screws made of metal (iron) stuck to it.
Complete the following sentence by filling in words from the box below:
_____ of the metal objects are attracted to the magnet, but _____ of the non-metal objects are attracted to the magnet.
some, none
Word box
all
some
none
Magnetism is a very interesting property and playing with magnets and materials is fun! Were all the metals that you tested attracted to the magnet?
Here, learners could be reminded that some but not all the metals were attracted to the magnet. Only iron, cobalt and nickel are magnetic. Learners don't need to know this, but they need to know that it is only a few metals that are magnetic. However, MANY appliances and tools are made of iron, making lots of the metals objects around us magnetic.
In the next activity we are going to test the magnetic properties of different metals. There is also a problem that Tom needs to help solve. After you have completed the activity you may be able to give him some advice on how to use magnetism to solve the problem!
Using magnetism to solve a problem
This activity is also ideal for small group participation. It requires a fair bit of reading, as there are a few lines of dialogue included. These could be read aloud by two learners, one playing the role of Tom and another playing the role of Uncle. The group can solve the problem together and Tom can present the solution to Uncle at the end of the activity.
It would be good to keep an eye out for small objects or pieces of aluminium, copper and iron (or steel) that could be used in the investigation. Zinc could also be used, as it is also not attracted to a magnet. Label the pieces with the type of metal it is made of.
Do not use South African copper coins in this activity. They will be attracted to the magnet because they are made of iron and only have a thin coating of copper on the outside. When learners discover that the coins are attracted to the magnet they may come to the incorrect conclusion that copper is attracted to the magnet, when it is really the iron on the inside that is magnetic.
MATERIALS:
Metal pieces: iron, aluminium, and copper
Magnet
The problem:
Tom likes to visit the junkyard to look for bits and pieces of rubbish to use in his inventions. Uncle owns the junkyard. He buys all kinds of scrap metal, which he then sells to a recycling company. The recycling company pays more if the metal is sorted by type. Uncle has a problem. He does not know how to sort the metal. One day, he is talking to Tom about his problem.
Uncle: "Tom, I need your advice. I know you are clever with inventions, and that you like a challenge."
Tom: "That is true, Uncle. I love a challenge! What is your problem? Maybe I can help you solve it with science!"
Uncle: "I have a huge pile of metal scrap that I need to sort. I know there is iron, aluminium and copper in the pile of metal scrap. But I have no idea how to do this! Iron and aluminium are both metals, and look very similar. Can you think of a way to help me sort them?"
What do you think Tom's advice to Uncle will be?
Learners should be encouraged to think of multiple solutions. One way of sorting the copper from the other metals would be by colour. Copper is reddish-brown, and the other two metals are silvery. Aluminium is light compared to iron. But sometimes it is not that easy to distinguish the two metals on the basis of relative mass (Aluminium is actually less dense than iron, but the concept of density may be too advanced for learners to grasp at this level.) Iron, however, is magnetic, while aluminium is not. This means a magnet would 'pick up' iron pieces but not aluminium pieces.
INSTRUCTIONS:
Afew metal pieces have been placed in front of you. Find the label on each piece and read the name out loud. Give everyone in your group a chance to say the names of the metals.
Write the name of each metal in the table below.
Look at each metal carefully. Do they look the same, or are they different? Can you describe the colour of each metal? Write the colour of each metal in the table below.
Hold each metal near the magnet. If the metal is attracted to the magnet, draw a cross (X) in the column "Magnetic". If the metal is not attracted to the magnet, draw a cross (X) in the column "Not magnetic".
Metal
Colour of the metal
Magnetic
Not magnetic
Write what Uncle should do in the space below. (It would help Uncle if you gave him step by step instructions on how to sort the metals.)
Learners' lists could contain the following:
Instructions for sorting metals using a magnet:
Take out all the reddish-brown pieces of metal and place it in one pile. This is the copper.
Test the remaining metal pieces with the magnet. If the metal is attracted to the magnet it contains iron. Put it in a separate pile.
All the pieces that are left should be put in a third pile. This is the aluminium.
An idea for extending this activity would be to ask learners to design a magnetic arm for pulling iron pieces out of a pile of scrap metal. Depending on the ingenuity of the learners the design could be drawn on paper, or even built from whatever materials they can find.
Not all metals are magnetic. We've seen how metals can be sorted according to their magnetic properties.
Metals and heat
Here, we pick up on an earlier conversation that alerted learners to the fact that when we cook food, we heat the outside of the pot, the food cooks on the inside. That means the heat that cooks the food travels through the metal. In the investigation that follows learners will investigate whether heat travels through plastic and wood in the same way that it travels through metal.
We will now investigate another special property of metals. But first, a question: How do we cook food on the stove? We put the food inside a metal pot, and then we heat the outside of the pot. This makes the food cook on the inside! How does the heat get inside the pot? The next activity will help us answer this question.
Learning about heat flow (thermal conductivity)
MATERIALS:
Container (1 liter yoghurt tub, bottle or a 2 liter ice cream container)
Warm water (not boiling)
Ice cold water
Metal spoon
Plastic spoon
Wooden spoon (a pencil or a stick will also do)
INSTRUCTIONS:
Fill the container with the warm water.
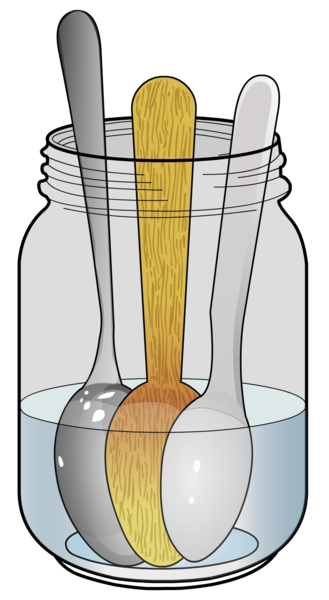
Place the spoons in the hot water so that their handles are above the surface of the water as in the image.
The handles of the spoons should not be in the water.
The three spoons in a container with warm water.
Leave them in the water for about 15 counts.
Feel the handles of each of the spoons in turn. Which spoon feels the warmest? Write your answer below.
The metal spoon feels the warmest.
Empty the container and rinse the spoons under the cold tap.
The spoons should be rinsed so that they all have the same temperature at the start of this part of the investigation.
Fill the container with the ice cold water.
Place the spoons in the ice cold water so that their handles are above the surface of the water.
Leave them in the water for about 15 counts.
Feel the handles of each of the spoons in turn. Which spoon feels the coldest? Write your answer below.
The metal spoon feels the coldest.
QUESTIONS:
Did the metal spoon feel warm after it had been standing in the warm water?
Yes it did. It felt the warmest of all three spoons.
Where did the heat (that you felt with your fingers) come from?
The heat came from the hot water.
How did the heat reach your fingers?
The heat travelled (moved) through the metal of the spoon.
Complete the sentence. Write the sentence out in full.
The spoon feels hot because heat flows from _____ to _____.
The spoon feels hot because heat flows from
the water
to
my hand
Did the metal spoon feel cold after it had been standing in the ice cold water?
Yes it did. It felt the warmest of all three spoons.
Where did the cold (that you felt with your fingers) come from?
The learners may answer: The cold came from the water.
Teacher note: This is the ideal opportunity to help them discover that heat flows (not cold!), and it is therefore heat that flows from the fingers into the cold spoon that makes us experience the cold feeling. When the heat flows from our fingers, our fingers effectively lose heat and start to feel cold. The heat that moves from our fingers to the cold spoon will start to warm the spoon.
How did the cold reach your fingers?
Heat flows from my fingers into the cold spoon. That is why my fingers feel cold.
Complete the sentence. Write the sentence out in full.
The spoon feels cold because heat flows from_____ to _____.
The spoon feels cold because heat flows from
my fingers
to
the spoon
Which material (metal, plastic or wood) is the best conductor of heat?
Metal is the best conductor of heat.
Metals and corrosion
The next section investigates corrosion (rust), and could be introduced by a conversation about metal objects that are shiny when new and become dull when they are left outside. Several pictures have been included below to stimulate the discussion. The important message to get across is that rust is a form of corrosion. Only iron rusts, but other metals can also corrode.
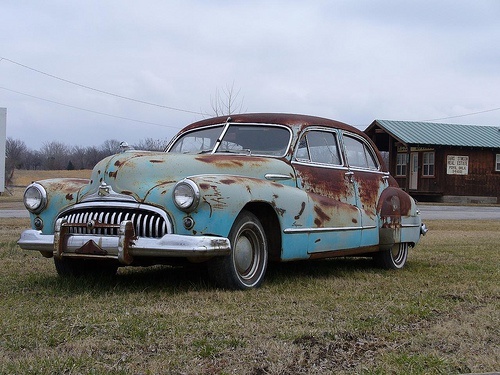
Have you ever noticed how some metal objects are shiny when they are new, but over time the shine disappears and they become dull and blotchy? The car in the picture was once shiny and new, but look at it now! It is covered in rust from standing out in the rain for so long.
An old car covered in rust.
Rust has a reddish-brown colour and a rough texture. Rust is very common; it is the product that forms when iron corrodes. During corrosion, iron reacts with oxygen in the air or in water to form iron oxide (the chemical name for rust). Rust is a type of corrosion, but it is not the only type.
Other types of corrosion include:
Tarnish (found on silver teapots, trays, trophies and jewellery)
Patina (the green coating that we sometimes see on copper objects)
Black spots that appear on brass.
Aluminium oxide (grey-white coating that forms on aluminium)
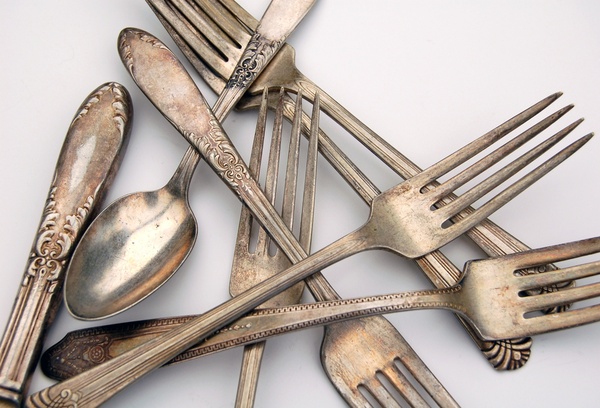
Can you see how this old cutlery is dull and tarnished?Can you see the green coating forming on this copper statue?
INVESTIGATION: Learning about corrosion (rust)
This investigation is ideal for small group work, and should be done over a number of days. On the first day learners will place iron nails in different media, and then observe how they rust over a period of 5 to 10 days (depending how much time is available). The containers should be covered with plastic wrap if possible, to prevent evaporation of the water. It is important that the nails in container C should be kept as dry as possible, so learners should be told to handle them only with dry hands. It may help to instruct them to always check the nails in container C first, before checking the other containers. If any of the contents in the containers should spill, they can simply be refilled with the same solution (water or salt water)
AIM: To find out how rust occurs
MATERIALS:
30 identical iron nails
3 small clean, dry containers (yogurt tubs or polystyrene cups)
tap water
salt water (made by dissolving 10 teaspoons of salt in a liter of tap water)
plastic wrap to cover the containers
METHOD:
Mark the containers by writing A on one of them, B on the second one and C on the last one.
Place 10 iron nails in each of the containers.
Pour enough tap water on the nails in container A to cover completely.
Pour enough salt water on the nails in container B to cover them completely.
Do not pour anything on the nails in container C.
Cover containers A and B with plastic wrap.
Place the containers next to each other in a safe spot where they can be left undisturbed for a few days.
Check the nails in the containers every day. Every day (preferably at the same time each day) count the number of nails that have rust on them. Make sure to return the same nails to the same container after you have examined them. Continue to do this over a period of 10 days.
Write your results in the table below.
RESULTS:
Day
Number of rusty nails in the cup containing water only (A)
Number of rusty nails in the cup containing salt water (B)
Number of rusty nails in the cup containing no water (C)
1
2
3
4
5
6
7
8
9
10
Use the space below to draw a line graph of how many nails had rust on them after each day.
When learners draw the graphs they could be encouraged to think about what the dependent and independent variables would be. Time (measured in days in this case) would be the independent variable and should therefore go on the horizontal (x) axis. Explain to learners that the independent variable is the thing that you are controlling (ie. you are controlling the time). Number of nails with rust on them should go on the vertical (y) axis since it is the dependent variable. This is because the amount of rust that develops is dependent on the time that the nails are left on the containers for. If all three graphs are drawn on the same set of axes, the graphs can be compared. The graph with the steepest slope (gradient) would represent the conditions that are most conducive to rust. It might be difficult to draw all three graphs on the same axis. In that case, draw three separate graphs for each of the containers, but use the same scale. That way, you will still be able
to compare the slope.
QUESTIONS:
In which cup did the nails start rusting first?
Cup B (the salt water).
Since this is an investigation, there are no right and wrong answers. One would expect the salt water to be most conducive to rust, but the learners may come to a different conclusion on the basis of their findings. The purpose of an investigation is for learners to develop a scientific explanation that is based on their evidence.
Complete the following sentences. You may use the words in the box below, or any other words that will make the statement true for you.
Iron rusts when it comes into contact with _____.
Iron will rust more quickly in _____ than in _____.
water (and salt water).
water, air
Word box:
air
water
salt water
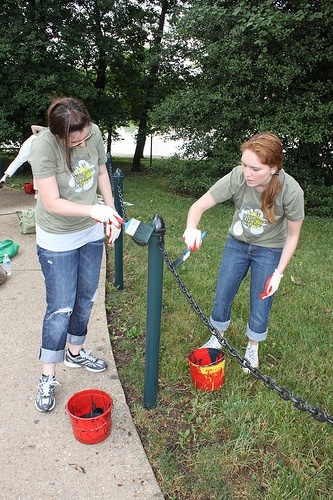
Can you think of ways to protect iron against rust? (Hint: Look at the following picture for a clue.)
We can paint the iron to protect it from rust.
These people are painting the iron poles and fences.
Although there are many ways to protect iron from rust, at this level it is enough for the learners to realise that applying a protective coating - such as paint - to the iron will protect it from rust. Soon they will learn that it is also possible to protect the iron from rust by processing it with other metals.
We have seen that iron rusts. Other metals also change when they are not protected. Have you noticed what coins look like when they are new? New coins are bright and shiny. Old coins are dull and they look dirty. That is because they have a dark layer of tarnish on them. In the next activity we will see how the layer of tarnish can be removed to make coins bright and shiny again.
How can dirty copper coins be cleaned?
South African copper and bronze coins (5c and 10c pieces) are suitable for this investigation. They should not be left in the salt and vinegar mixture for too long or the copper coating will dissolve completely to expose the iron underneath. The reason why a metal bowl is unsuitable is because the metal in the bowl will react with the copper in the salt and vinegar mixture. A clear bowl or large beaker (plastic or glass) would be best because learners will be able see the reaction through the side of the container, but a clean yoghurt or ice cream tub will also do the trick.
MATERIALS:
20 dull, dirty copper coins
1/4 cup white vinegar
1 teaspoon salt
A clear, shallow bowl (not metal)
Paper towels, tissues or sheets of paper
INSTRUCTIONS:
Put the salt and vinegar in the bowl. Stir until the salt dissolves.
Dip one coin halfway into the liquid. Hold it there for about 10 seconds, then pull it out. What do you see?
If the coin is held with one half in the liquid and the other half above the liquid, then learners should clearly see the contrast between the treated and untreated halves of the coin. It may be better if the educator demonstrated this step.
Place all the coins into the liquid. You can watch them change for the first few seconds. After that you won't see anything happen.
After 5 minutes, take half of the coins out of the liquid. Put them on a paper towel but do not rinse them or dry them.
If the coins are put directly onto the paper without rinsing or drying them first, the reaction between the coins and the salt-and-vinegar mixture will continue and the paper underneath the coins will become greenish-blue. This is due to dissolved copper ions.
Take the rest of the coins out of the liquid. Rinse them really well under running water, and put them on a paper towel to dry. Write "rinsed" on the second paper towel.
If the coins are not rinsed and dried properly, the reaction between the coins and the salt-and-vinegar mixture will continue and the paper underneath the coins will become greenish-blue due to dissolved copper ions. You want to avoid this.
After about an hour, look at the coins on the paper towels. Write your observations in the table below.
Item
What does it look like?
Coins before you put them in the vinegar-and-salt mixture
Unrinsed coins after one hour
Rinsed coins after one hour
Paper under the unrinsed coins
Paper under the rinsed coins
QUESTIONS:
Why did the coins look dirty before you put them in the vinegar-and-salt mixture?
The coins looked dull and dirty because they were covered with tarnish.
What happened to the coins in the vinegar-and-salt mixture? Why do you think this happened?
The coins became shiny again. The vinegar-and-salt mixture took away the tarnish.
Taste a few drops of the clean vinegar. What does it taste like?
The vinegar is sour.
Can you think of another liquid that could be used instead of the vinegar? (Hint: What other liquids taste sour?)
We could use lemon juice (or orange juice) instead of vinegar.
What happened to the unrinsed coins? Did they also become clean and shiny?
No, they turned blue-green.
Next, we are going to learn more interesting things about metals and what they are used for.
Uses of metals
This section focuses on more ways in which metals are used. Draw learners' attention to metallic objects in and around the classroom. They could each bring one picture of a metallic object to class and these could then be sorted into categories, for instance 'transport', 'the kitchen', 'industry', etc. Learners could generate the categories themselves, and then be encouraged to think about the reasons why metal is used for each particular purpose. The second paragraph discusses why metal is used for electrical cables and is a good example of how such a discussion may be encouraged. The activity that follows has the same purpose.
Metals have thousands of uses. We use metals every day, sometimes even without knowing!
Metals are ductile and good conductors of electricity. This is why metal is used to make the wire inside electrical cables. Without electrical cables we would not have electricity in our homes or schools; we would not have lights or television, or telephones. (Next term we will look more at electricity!)
Metals are extremely strong and can be turned into thin sheets. These sheets can be used to make the bodies of the cars, trucks, trains and aeroplanes that are used to transport people and goods from one place to another.
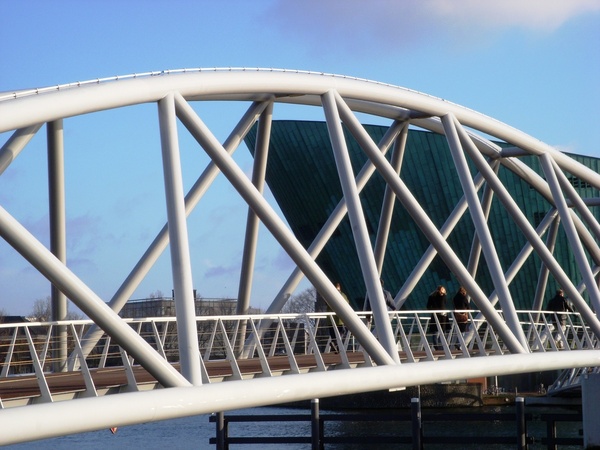
Aeroplanes are made from strong, durable sheets of metal.A bridge made of metal.
The strength and durability of metals make them very important as building materials, not only in visible ways (such as metal roofs and window frames), but also in invisible ways (such as metal supports inside the concrete that bridges and tall buildings are made of. Even furniture is sometimes made of metal!
The uses of metals in your home
This can be used as a possible project. Learners can also then choose one object and research how it is made.
INSTRUCTIONS:
Choose 8 metal objects from home (you could also choose your classroom).
Next to each metal object on your list, write why you think metal was used to make this object. You should write what property of metals makes it the best material for that particular job.
If you think the object could also have been made from another material, say which material. You may want to look at the example below for ideas.
Metal object
Reason for using metal in this object
Other material(s) that could be used instead of metal
Broom handle
Metal is strong and durable
Wood, strong plastic
Present your findings on a poster with a table where you record your observations (it could be similar to the one above).
Include some pictures or photographs of the objects and do not forget to give your poster a heading.
Turn back to the front cover for Matter and Materials where you can see the Thunderbolt Kids are at a construction site for a stadium. Identify the objects that are made of metal and write them down below.
Bulldozer, tractor, cement mixer, Farrah's spade, stand for the sign saying "Wet cement", metal poles lying on ground, scaffolding and poles in the stadium, the pulley mechanisms Jojo is using, nails on the magnet, cranes, handles of buckets, wheelbarrow, the rims of Sophie's glasses.
Metals have some special properties.
Metals can conduct heat and some metals are magnetic.
Metals have many uses.
When we choose a material for a certain purpose, we look for a material with the right properties for the job.
List as many properties of metals as you can think of.
Metals are solid, strong, malleable, ductile, and lustrous. In addition: Some metals are magnetic; metals conduct heat and electricity; and some metals corrode (for instance iron rusts).
Are non-metals magnetic?
No
Tom used magnetism to help his uncle. Which metal in the junkyard was attracted to the magnet?
Tom used a magnet to pick up all the iron scrap in the junkyard.
Are all metals magnetic?
No
Why are most pots and pans made of metal?
Metal is a good conductor of heat and that makes it a good material for cooking utensils.
Why do some pots and pans have handles made of plastic or wood?
Metal conducts heat but plastic and wood do not. That means the handles will stay cool even when the pot is too hot to touch.
Why does iron that is shiny when it is new become dull and blotchy when it stands outside for a long time?
The iron rusts.
What does rust look like? (Describe what it looks and feels like.)
Rust is reddish-brown and feels rough and flaky.
What is another name for rust?
Corrosion.
Do all metals rust?
No, only iron rusts.
Your dad is putting up a new iron fence in front of your hose. What would you tell him to do to make the fence last long?
He can paint it as this will help prevent the iron from rusting.
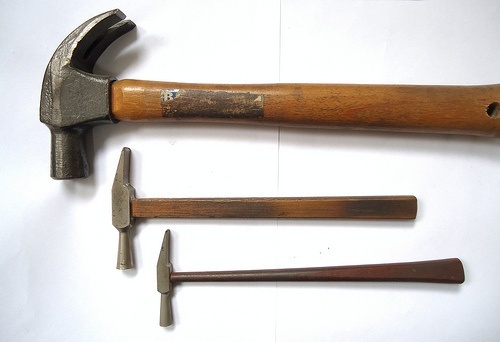
Look at the picture below of a hammer. What is the head of each hammer made from and why do you think this material was used?
Different sized hammers.
The head of the hammer is made from metal. Metal is strong and hard. The hammer is used to hit other hard objects (such as nails) so it needs to be made from a hard material.
If you had to advise your parents or a family friend who wants to buy a set of chairs and tables for their garden to replace the plastic ones which have broken, what would you advise them are the best types of furniture for outside in the garden? Explain your answer.
The best furniture should be made of some metal (not iron) as they will be more durable and not break like the plastic. Metal furniture will last longer than, for example, wooden furniture, if left outside and in the rain.
Some jewellery is made from metal. What types of metal is jewellery made from and why do you think some of these metals are so expensive.
Jewellery is made from metals such as gold, silver, platinum, gold and also copper. These metals are expensive because they are not very common to find in the Earth and they go through expensive procedures to get them looking the way they do in the finished product. They are also expensive due to the demand - a higher demand raises the price of something.
Why do you think your kitchen utensils (such as knives, forks and spoons) are normally made from metal and not plastic and wood? Why then do fast food restaurants give you plastic utensils with your take aways?
Kitchen utensils that need to last a long time are made from metal. This is because the metal is strong and will not dent or break when thrown into the drawer or washed in the sink. At fast food restaurants, you are normally given plastic utensils as these can be thrown away. They are not meant to last long. If they had to supply you with metal utensils with all takeaways it would be much more expensive.
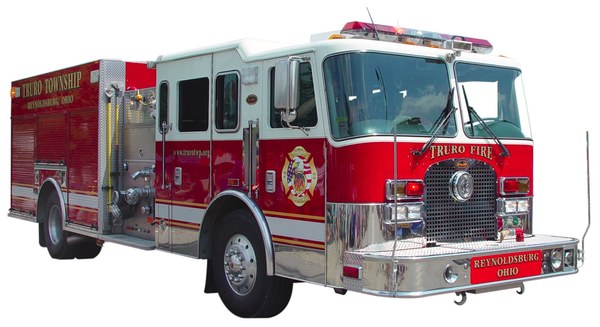
Below is a picture of a fire engine truck. Can you imagine a fire engine made from plastic or wood?! What properties of metal make it suitable for the fire engine?
A fire engine made of metal.
Metal can be hammered into sheets which are strong and durable and these are used to make the shell of the truck. The metal is hard and strong so when people climb on the truck, the metal does not break or crack like plastic would. Metal also only melts at very high temperatures. Since a fire engine often gets close to fire and in very hot areas, if it was made from plastic, the plastic would melt. The metal does not melt. If it was made from wood, the wood could also catch fire and burn. The metal will last long if it gets wet from the hoses or standing outside on the sun and rain. Plastic or wood would not last as long and begin to perish or rot.