What would you find if you could dig a very deep hole?
Where does soil come from?
If you were going to buy a farm, what kind of soil would you look for?
Chapter 2 deals with the rocky crust of the Earth; we aim to teach the children where soil comes from: soil is broken-down rock plus organic matter from plants and animals. However, we can't just teach about the crust because that would leave a hanging question - the crust of what? So we spend a little time looking at what the crust is covering, and so we look at the structure of the Earth.
Rocks
You saw the photo of the Earth in at the beginning of Chapter 1. What is on the surface of the Earth? Name all the features (parts) you can think of.
Answers may include land, sea, forests, rivers, deserts, air, clouds. Learners may correctly include animals and people although they cannot see them in the picture.
What do you think is under the surface?
Answers may include soil, rocks, mines, bones, roots, drainpipes, and many more. Encourage them to think of as many ideas as they can.
What will you find if you dig a hole, as deep as it can go?
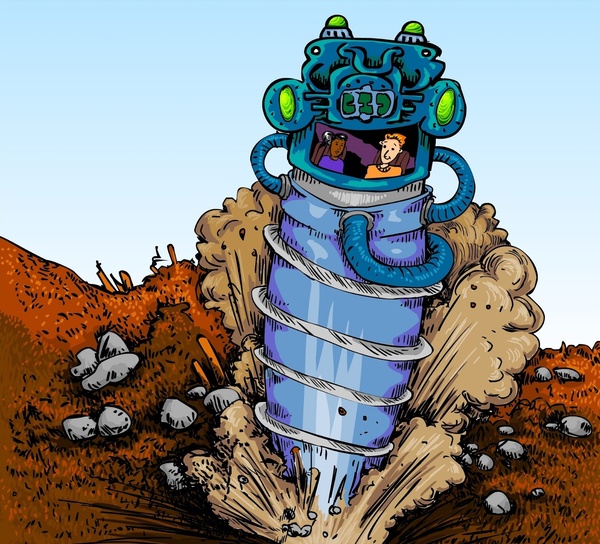
Look at the picture of a digging machine and imagine you are driving it.
Imagine that you have a powerful digging machine.
The purpose of this drawing task is to make learners grapple with the idea that they are on a ball-shaped Earth. Most learners have no problem with saying that the Earth is shaped like a ball and most have seen pictures of the ball-shaped Earth like Figure 1. However, this concept is not easy to think about when you are actually standing on the ball. So the question, "what would you find if you could dig a hole right through the ball?", makes them move mentally between the ground they can see and the view of the ball-shaped Earth as seen from Space.
QUESTIONS:
What is under the floor of your classroom?
This question is for discussion.
Imagine that you use the machine to dig as deep as you want. You drive it down into the Earth. What do you find as you go down?
Let the learners discuss this before they write. If they cannot write, let them draw pictures of what they think they will find under the Earth.
Make a drawing of yourself, the digging machine and the hole. In your drawing, show (a) the Earth (b) the digging machine with you inside (c) the hole (d) what you find at the deepest part of the hole.
Give the learners enough time to think while they make their drawings.
Look at the learners' drawings but do not correct them. If you give them the right answer, you will stop them thinking about the problem. At the end of the chapter they will get a chance to change their ideas - see Activity: So what is under our feet?
Some learners' drawings might show the hole going down through soil and rocks and underground water and volcanoes. Other learners' drawings might not show any of these things; it depends on how much general knowledge they have by Gr. 5. Correctness does not matter at this stage: we are raising their curiosity by asking the question "what is deep down under our feet?"
If they are thinking about that question, then the next section will make more sense to them.
So what do we find as we dig deeper?
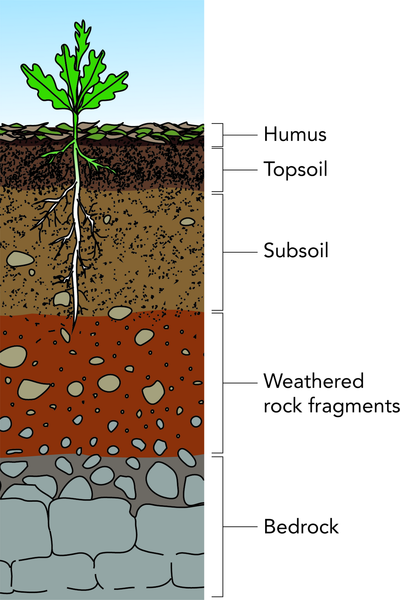
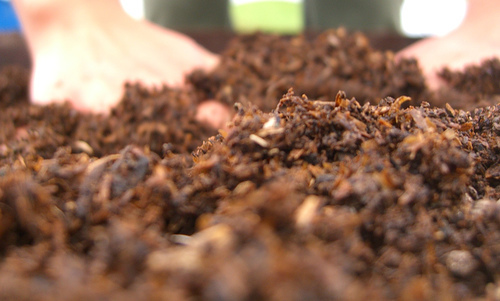
When we begin to dig, we first dig though topsoil. Good topsoil is usually a dark colour.
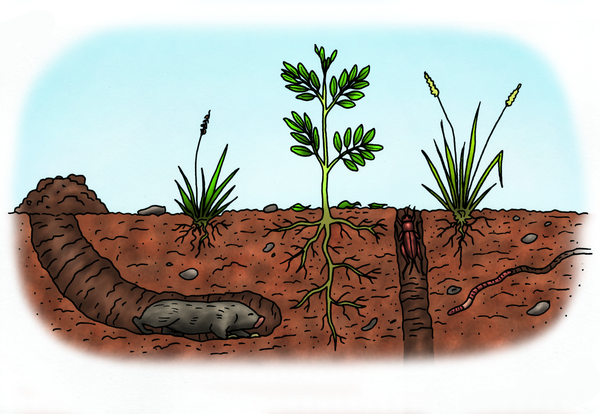
Topsoil is usually darker than the soil underneath.Plants and animals depend on topsoil.
Topsoil is very important for life. As you can see in the picture, plants and animals depend on topsoil.
If we dig deeper, we find subsoil. This layer is often sandy and orange in colour. When we dig even deeper, we come to rock. this layer of rock underneath the soil is called bedrock. Look at the illustration and find the topsoil. Find the subsoil underneath the topsoil and the bedrock at the bottom.
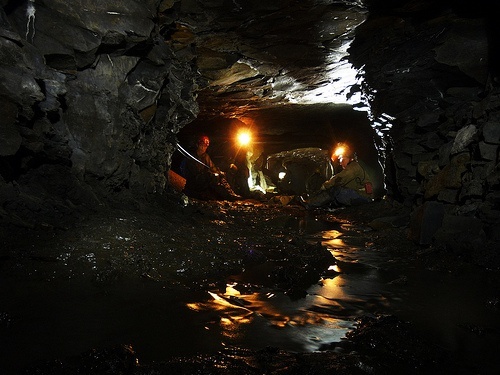
When we dig through the rock, a few hundred metres deep, we may find different layers of rock. We may even find water in cracks in the rock in some places. We may find coal in a few places.
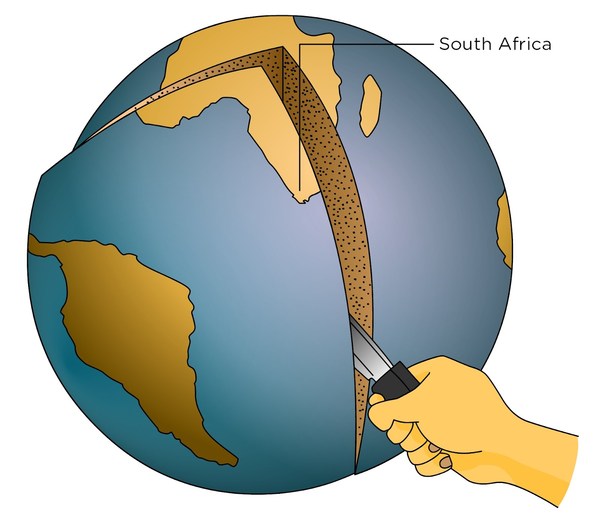
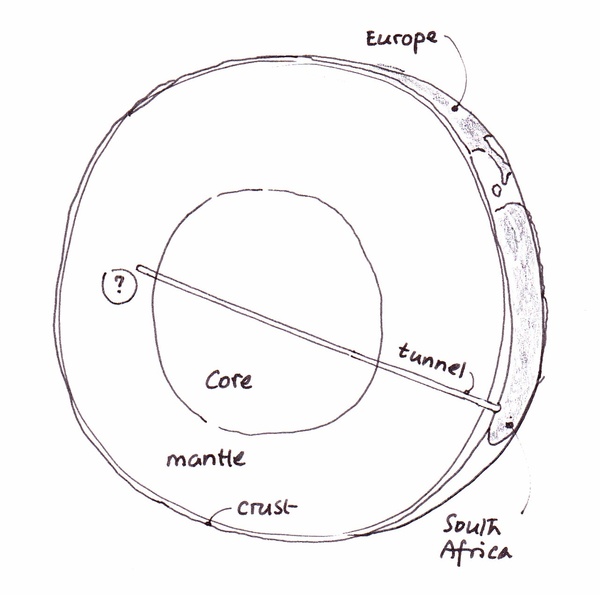
Deeper down, about a kilometre deep, we may find oil and gas. Still deeper, we will find very hard rock which will feel hot to touch. In very few places in Gauteng and the Free State, we will find rock that has gold in it. Look at the following picture. Can you see a hand cutting a slice out of the Earth?
Imagine we could cut a slice out of the Earth.
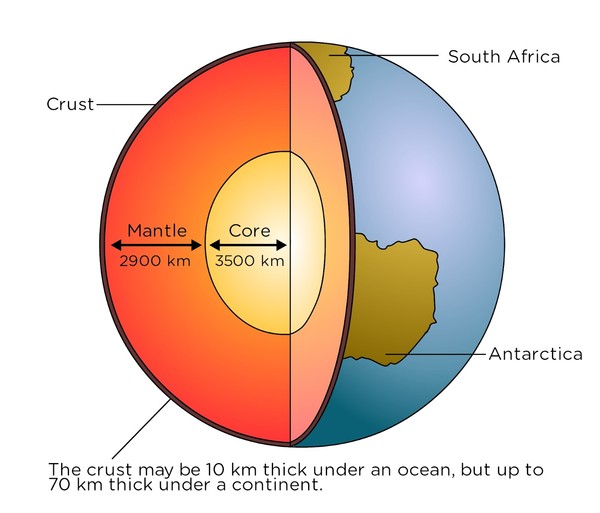
In the next picture you see what the Earth is like inside.
If we cut the slice out of the Earth, the Earth could look like this inside.
The surface of the Earth is the crust
People have not really explored deep into the Earth. We live on the rock that is called the crust of the Earth. The crust is the outer layer of the Earth's surface. Find the crust in the previous diagram. The crust consists of rock and soil.
The Earth's crust is about 70 km thick. Humans have only dug as far as 5 kilometres deep, which is not very far at all! If you look at the diagram of the Earth, you cannot even see the hole in the crust because it is so small.
If you dig a hole in the beach sand, what will you find if you dig very deep?
You will find rocks, if you dig deep enough. Children who have dug holes in sand will also tell you that sea water flows through the sand and flows into the hole.
If you went down under the sea water, to the bottom of the sea, what would you find down there? Explain what surface you expect to find. Will it be sandy, or rocky, or could you find mud down there? Do you expect to find different layers?
Sand near the beach, but further out to sea you find fine mud and under it you find rock.
Far out to sea, far from the beach, the water is very deep. The sea may be many kilometres deep.
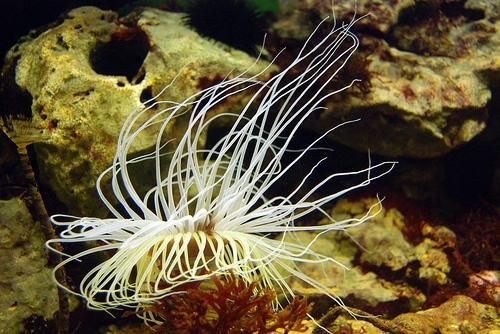
The deepest part of the sea is called the Marianas Trench. It is near the Marianas Islands, south of Japan. You can find this place on the classroom globe or a map. The deepest part of all the oceans is here. It is a trench (like a valley with steep sides) that is 11 kilometres deep. In fact, the trench is so deep that the light from the Sun cannot reach the bottom, leaving it pitch-dark. The water presses down with a pressure that is like the weight of three buses pressing on your thumbnail!
It must be such an interesting world in the depths of the oceans. I wonder what it is like?!
Three scientists have gone down there in small submarines, and taken pictures and collected rocks. The submarines had bright lights, and the scientists were amazed when they saw animals that live down there. You can see an animal called an anemone in the next picture.
They found rocks that look like those in photograph. That means the Earth's crust rock lies under the oceans as well as under our feet. The crust is a layer of rock all around the Earth, like the shell of a hard-boiled egg.
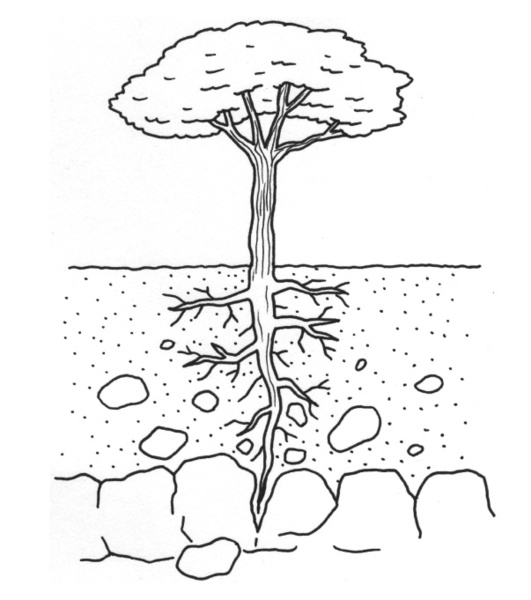
The mantle and the core lie even deeper under the crust.
If we go deeper than the crust, we go into rock called the mantle. The mantle is the layer that lies underneath the crust. Mantle rock is much hotter than the rock that is found in the crust. The rocks are so hot that they are soft in some places, like toothpaste. The hot rock pushes upwards against the crust. Where there is a weak spot in the crust, the hot rock might burst through. This is how volcanoes erupt. The mantle is 2 900 km thick, so it is still a long way to go down to get to the core.
Find the mantle in the diagram of the Earth cut open. Mark it with your pencil. How could you get to the mantle? Which way do you have to go?
You would have to dig a very deep hole down into the centre of the Earth.
The core is still deeper than the mantle. It is very hot, as hot as the surface of the Sun, and made mostly of iron.
Iron melts at those temperatures, but the iron is being pressed so tightly by the mantle all around it that it cannot melt.
Thinking about the layers of the Earth
QUESTIONS:
What is the diameter of the Earth?
Think of the Earth as a circle; then the diameter means the distance across the middle of the Earth. The diameter is 12 900 km. They can read this off the diagram.
The Earth is really a ball, so how deep can the hole be?
Only 12 900 km, because after that the hole will come out of the other side of the Earth!
If the digging machine went as far as it can go, what is the last layer of the Earth that it would dig through?
It will dig through the crust, but from underneath and then it will come out into the air.
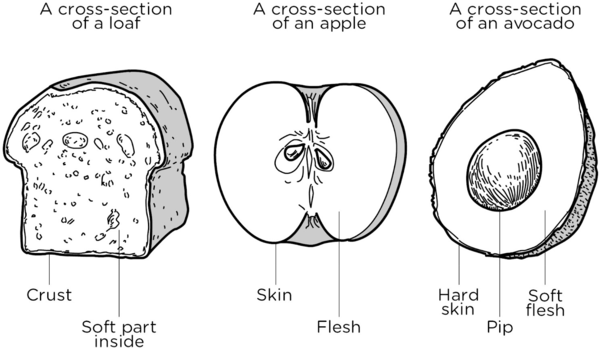
Which is the best model of the Earth - a loaf of bread, an apple or an avocado? Look at the three pictures below. Which of those is most like the Earth? Explain your answer. Remember that the Earth has a hard crust, a hot sticky mantle and a hot core.
Three different possible models of the layers of Earth
The bread has a crust, but no core. The apple has a peel or skin and a core, but the core is not one solid thing. The avocado has a tough skin or peel, and a solid core, so it is quite a good model of the Earth.
Although the model you chose is most like the Earth, it is not exactly the same. In what way is this model not like the Earth?
One example is that the avocado pip is not hot, but the core of the Earth is very hot.
Soil, air, water and sunlight support life on Earth
Life on Earth exists on the very thin layer around the planet - the crust. The soil is a thin layer that forms the top part of the crust. Plants need soil to grow in. The plants also use energy from the Sun to grow, and they make the oxygen we and all the animals need to breathe. You already learnt about this in Life and Living.
So what is under our feet?
INSTRUCTIONS:
In the first activity at the beginning of this Chapter you drew pictures of yourself digging a hole into the Earth. You had to imagine you were making the hole as deep as possible.
Perhaps you feel your picture is correct, or perhaps you want to change your idea about the Earth.
Look at those pictures now, and do the activity again.
QUESTIONS:
If you could make a hole into the Earth, through the floor of your classroom, what would you find down in the Earth?
Imagine you have that machine that can dig as deep as you want. You drive this digging machine as far as it can go. What do you find?
Do a new drawing of yourself and the digging machine and the hole. Your drawing must show the hole that the machine makes if you let it go on until it cannot go further.
The hole will come to of the other side of the Earth.
Do you think about the Earth the same way you did when you started this chapter? Have you changed your ideas about the Earth?
Use the classroom globe to answer this question: If you dug a hole straight down into the Earth from South Africa, and went through the core of the Earth, where would the hole come out? Draw a picture in the space provided.
Answer: The hole would come out in the Pacific Ocean, near Hawaii, about 26 degrees north of the equator, and about 150 degrees west of the Greenwich meridian. Check this for yourself on your globe. Let the learners work with the globe until they solve this for themselves. However, they are not allowed to poke a pencil into the globe!
An example of the drawing learners should draw
This is what the hole would look like. Let the learners draw their own ideas before you draw this on the board
Soil comes from rocks
Rocks do not last for ever! They seem very hard and indestructible, but are they? Let's have a look.
Can hard things like rock and stone wear away?
Stones are hard. People say that a thing that is made of stone will last for ever. But is this true?
MATERIALS:
two stones or pieces of rocks
a sheet of paper
INSTRUCTIONS
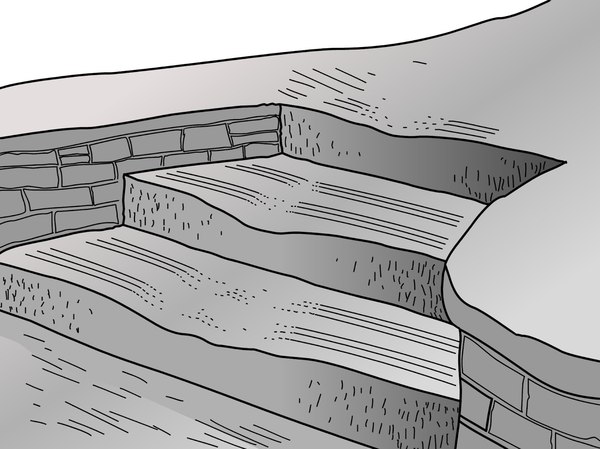
Find a cement step that everyone at the school walks on. Sweep the step clean and then look carefully at the step.
Why are these steps wearing away?
Can you see where people put their feet? What has happened there?
Find a piece of cement under an outside tap. Look carefully at the cement, where the water falls on it. You might see that the cement is rougher just where the water hits it. The cement has lost little pieces.
Look at the place where the water hits the cement. How is the cement changing?
Find out how long the cement has been there. Perhaps it was put in when the school was built. So how many years did it take to wear away the cement?
The learners have to find out when the school was built.
Find another object that is being worn away. Tomorrow, tell the class what you have found and write what it is below..
The learners could report that they found a door edge; corner of building; pencil point; piece of board chalk; bottom of spoon; sole of shoe.
What do you think is wearing away the object?
Many shoes wear away the step, or many shoulders that rub against the object. Or paper that the pencil rubs on wears away the pencil.
When a small bit breaks off the object, where do you think it goes?
Learners may not have the idea that small bits break off. Find out whether they really think this.
Are the small bits still lying somewhere, do you think?
If they do think of small pieces breaking off, learners may believe the pieces no longer exist. Here we are dealing with conservation of matter, which is a mental operation the learners must develop.
Now rub the two rocks together for three minutes. Let all the little pieces fall onto the paper.
Rubbing rocks together to make sand
Make a pile of the pieces and look carefully at them. They look like a pile of sand.
You are changing the two rocks into sand!
In nature, rocks turn into sand. But how does it happen?
Big rocks break up into smaller rocks
We know that we can break big stones into smaller stones. But when we see small stones lying on the ground, it is hard to think how they were broken up.
In nature, rocks break up in many ways. We will look at just three of those ways.
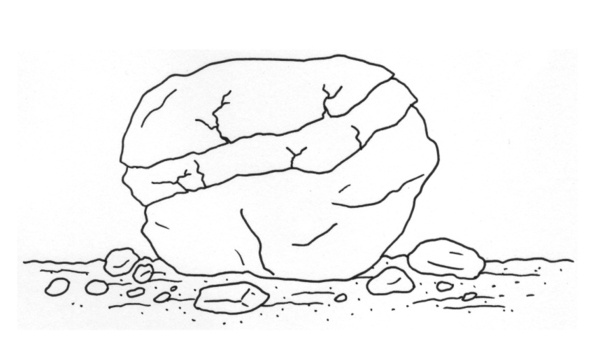
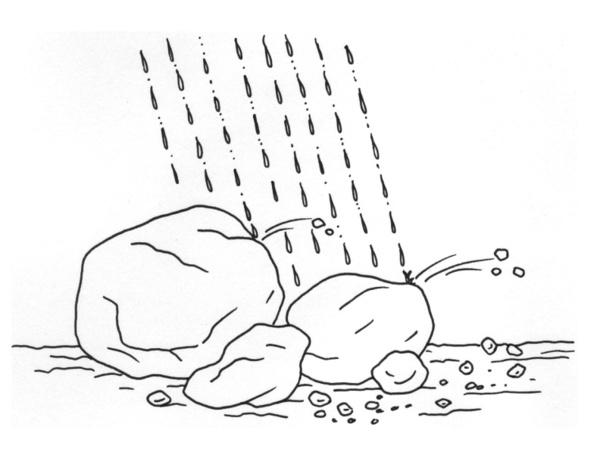
1. Bigger rocks break up into smaller rocks
Over time, rocks can get cracks in their surface. Water gets into the cracks and causes these cracks to get bigger. Pieces of rock then break off when the cracks get bigger. Smaller and smaller pieces of rock form as the rocks breakup more and more.
Can you see the cracks forming in this rock to make smaller and smaller pieces of rock?
2. Water breaks up the surface of rocks
Soil contains a little water. The roots of plants can change this water so that the water becomes an acid. Vinegar is an example of an acid that we use in our everyday lives.
Acid can work on stones to break them up. The acidic water breaks the surface of the stone and then the stone can break more easily.
Rain water can also break up and wear down the surface of stones causing small pieces to break off. We saw an example of this with the water from the tap breaking up the cement.
Rain wears down rocks and causes smaller pieces to break off.
3. Stones rub together, and their surfaces break up
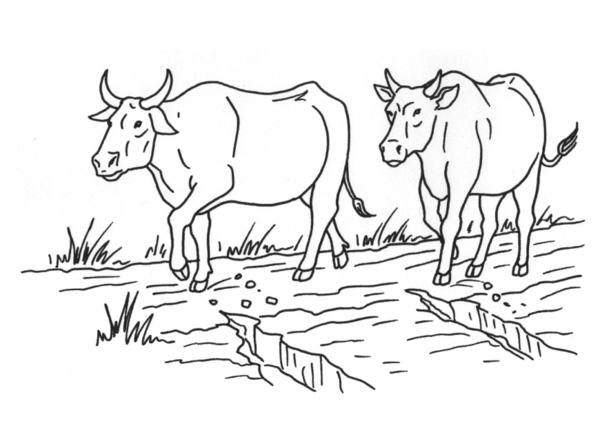
Stones rub together when water moves them, or when wind blows them against bigger stones. People and animals walking on a path kick stones and break off little pieces. Small stones become even smaller, and eventually the very small pieces become sand.
People and animals break stones into smaller stones when they walk over them.
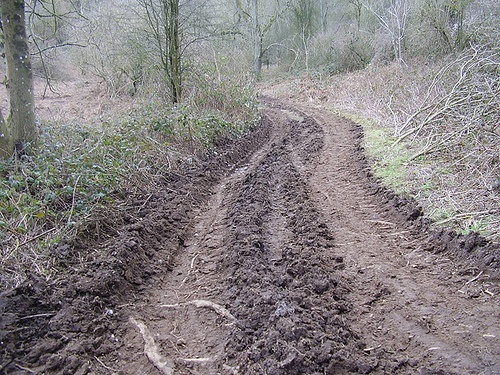
The constant impact from heavy tractors driving through will break larger rocks up into smaller pieces. http://www.flickr.com/photos/credashill/6773976264/The roots of plants also cause stones in the soil to rub together and break up into smaller pieces.
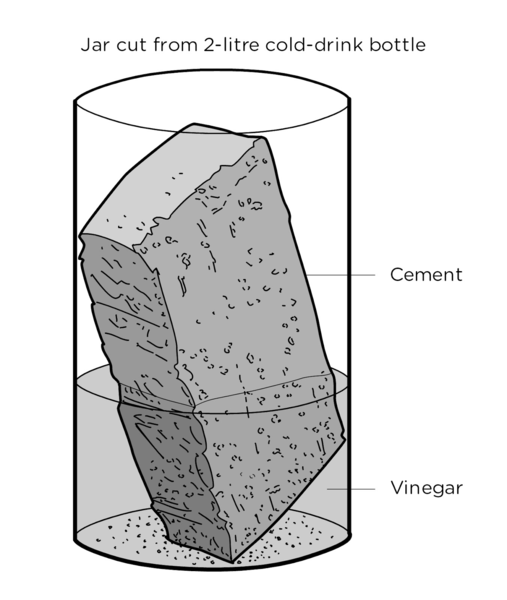
Make a model of acid water breaking up rocks
In real soil this change takes many years. We can make it happen in the classroom in a week. We will use vinegar to represent the acid water in the soil. Look at the picture below.
MATERIALS:
acement brick (not the shiny dark red or orange bricks)
a large plastic container (like the bottom half of a plastic cool drink bottle)
a bottle of white vinegar
Vinegar acid is working on the surface of the cement brick. Parts of the brick are falling off.
INSTRUCTIONS:
Put the cement brick into the container.
Pour enough of the vinegar into the plastic container to cover half of the brick.
Put the container in a place where everyone can see it every day for two weeks.
Cover the container and make sure the mixture does not evaporate and leave the brick dry.
QUESTIONS:
Draw the brick as it looks on Day 1.
Draw the brick as it looks on Day 14.
How has the brick changed?
Has the part of the brick that is above the vinegar changed in the same way as the part that is under the vinegar?
The vinegar moves up the brick and reacts with substances in the brick. you may find white whiskers of a new substance that has formed from the reaction between the brick and the vinegar.
Have any parts of the brick fallen off to the bottom of the container?
Write out the whole sentence in your book and complete it with words from the word box:
Word box:
represents
represents the real
is not
This equipment is a model of rock, not the real rock. The brick _____ a real rock and the vinegar _____ water around the roots of plants.
represents ... represents the real
Making soil
Rocks break down and slowly change into sand. This change needs thousands of years to take place because soil, wind and water do it very slowly. Sand is not soil. More changes must happen to sand before it is soil.
Look at different kinds of soil
MATERIALS:
atin-can half full of moist topsoil (moist means it is not dry)
a hand lens or some other kind of magnifier
a sheet of white paper
toothpicks, matches or pieces of dried grass that you use for moving the little pieces of soil.
INSTRUCTIONS
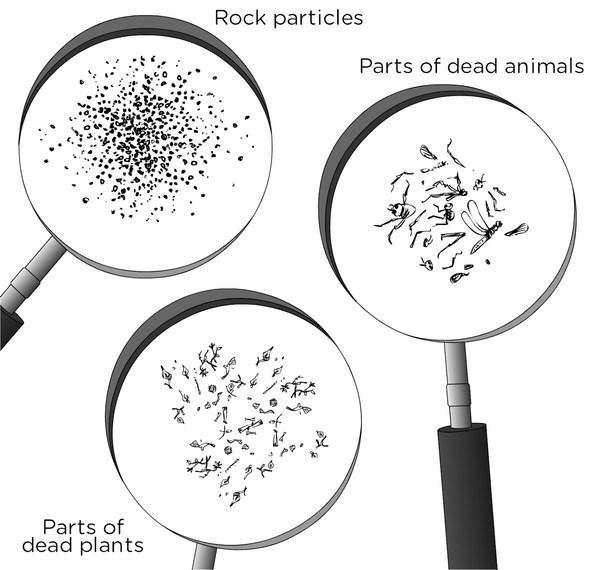
Smell the soil in the tin. Does it have a smell?
Put a teaspoonful of the topsoil on the white paper and spread it out.
Use your stick to move the small bits of soil that you find there. Look at the soil with the magnifier. Make piles of bits that look the same.
Look closely at the soil. What pieces do you find there?
One pile will be rock grains. You will find very small pieces of rock and some pieces that are not so small. There will also be some grains that are almost too small to see.
Another pile will be small bits of plants. You will find very small pieces of sticks, leaves and roots.
Another pile will be small bits of animals. You will find very small pieces of beetle shell, or legs, or wings of flies.
You may even find a small live animal! If you do find one, do a drawing of it on your paper and then let it go on the soil outside.
QUESTIONS:
What colour is your soil? Use words like "dark brown", "grey" "orange" or "yellow".
Draw some of the grains of rock (sand) that you find. Draw any small bits of plants or bits of dead animals that you see in the soil. Draw any small living animals that you find in the soil. Then let them go, outside.
Complete the sentence: Soil has sand but it also has...
...rock particles, organic matter such as pieces of plants and dead animals, etc.
We can make soil in a few weeks, but only a small amount of soil.
Begin to make soil
The class should begin this activity on the first day of the 4th term, because it needs about 3 weeks to be complete.
In this activity you begin the slow process of making soil. Your class perhaps started your compost column in the first week of the term.
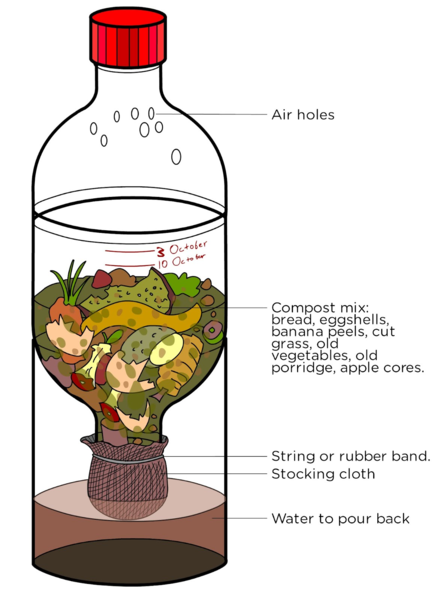
MATERIALS:
3big cool drink bottles like the ones in the picture
an old stocking
a strong rubber band
felt-tip pens that will write on plastic
a big needle
a pair of scissors
scraps of vegetables and fruit, leftover porridge, cut grass, enough to fill a big bottle to the top
a cup of water
Cut and join 3 the cold drink bottles like this.
INSTRUCTIONS:
You need the plastic bottles you collected. Cut and join them together as you see in the picture.
Cut a piece of stocking to fit over the neck of the bottle that is upside down. The stocking will stop the vegetable peels falling through the hole, but it will let water go through.
Add the vegetable peels, old bread, and leaves.
Now slowly pour in the cup of water. Let the water go down through the stocking, into the bottom container.
Now use the needle to make air holes in the top bottle, as you see in the picture.
Mark the height of the compost column on the plastic. Write the date next to the mark.
Each Friday, mark the height of the compost column again, and write the date on the bottle.
Then take out the bottom container with the water in it, and pour the water into a tin.
Then use the tin to pour all the water slowly back into the compost. This will stop the compost drying out.
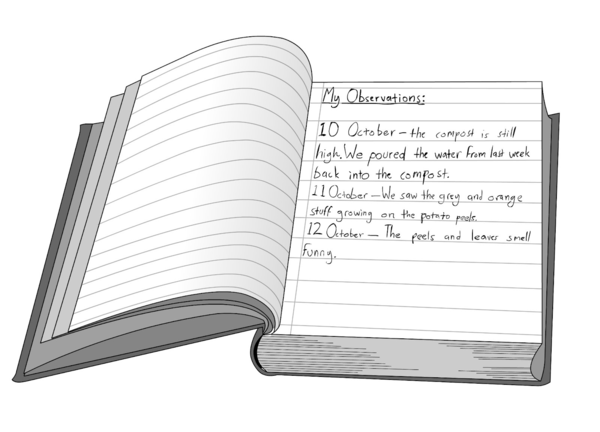
Begin a class logbook. A logbook is a book in which you write down what happens on a day. Look at the example below which shows Sophie's log book from when the Thunderbolt Kids did the experiment in their class.
This is a page in Sophie's logbook.
In the beginning, you might think the compost looks ugly, and is just a lot of rotting food and leaves. It might have a smell. As the weeks go by, you may notice changes in the colour of the compost, and also in the colour and size of the small pieces. You can also see some things begin to grow in the compost. The smell will change. You may also see insects appear from the compost.
QUESTIONS:
Did you notice any changes in the compost? Did you see anything begin to grow in the compost?
This is dependent on the activity - possibly fungi.
What happens to the colour of the water that you pour back in every week?
It should get darker and more "muddy" in colour.
What do you think is in the water?
Possibly fine bits of broken down organic material from the plants and other matter.
Why must you use the same water each week and not take fresh water?
This is so that you do not lose the nutrients from that water, because if you use fresh water, then you are washing out and losing the fine bits that have been broken up and beginning to form in the compost.
Why does the compost column become lower as the days go by?
As the days go by, the organic matter is broken down into smaller particles which can pack closer together and take up less space. So the compost column decreases in height.
Where do you think the insects come from?
Possibly from eggs/larvae that were present on the organic matter before putting it into the compost column.
The grey hairy things that you see growing in the vegetable peels are fungi, and they help to break down the peels. There are many kinds of fungi and they can have different colours.
When you see insects in the compost column, they could come from two places. They may be fruit flies that can get in through the air holes, but they may also be hatching from eggs that insects laid in the peels and leaves before you put them into the plastic bottles. Do you remember in the first term when we did Life and Living, we observed the life cycle of fruit flies?
After about 4 weeks, your compost will be a dark colour and the big pieces will have broken down into small pieces. You can pour out the compost and mix an equal amount of sand with the compost. Now you have made a little soil.
Real soil is more complex than this mixture, and the living things in the soil make substances that bind the grains of sand together, or break down the grains into smaller pieces. But for Gr. 5, it is enough to help the learners understand that soil is not just sand.
Microorganisms in the soil
When introducing microorganisms, start off with a discussion about them and ask learners whether they think microorganisms are living or not.
When you looked at soil, you found sand grains, small bits of plants and small bits of animals. But there was another group of things you could not see, because they are too small. They are microorganisms. They are living things that, in the soil, change dead plant and animal material into substances that plants can use and absorb through their roots.
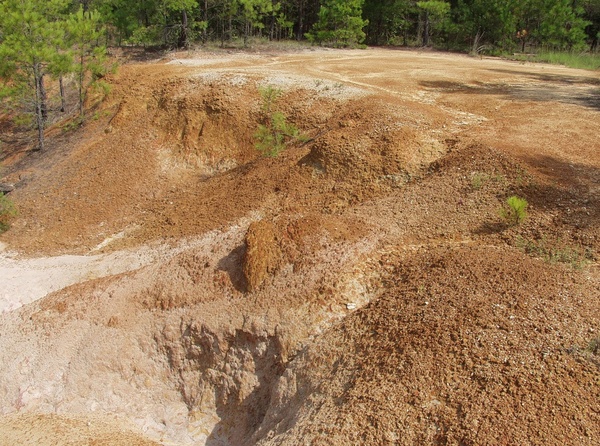
If we work hard, we can make a small amount of good topsoil in a term. But a farmer needs good topsoil all over the farm. Nature works all over the Earth but it works very slowly. Nature needs about 1 000 years to make topsoil just 10 cm deep. If rain washes away the topsoil the farmer cannot grow good crops on that land. When the topsoil has been lost due to wind or rain, we say erosion has taken place. Look at the picture below.
Even if the farmer stops the erosion, it will be about 1 000 years before nature can make new topsoil to replace the soil that has been lost.
If there is too little topsoil, then there will be too few plants for animals to eat. This means that all animals depend on the topsoil, even animals like lions that only eat meat.
We can say that lions depend on topsoil for their food, although they do not eat topsoil. Why do lions depend on the topsoil for their food? Explain your answer. Hint: Think back to what you learnt in the first term in Life and Living about food chains.
Lions eat other animals, such as impala, zebra, giraffe, etc. These animals are herbivores which eat grass and other plants. The plants that these animals eat need topsoil to grow in. So the lions are indirectly dependent on topsoil by their feeding relationships.
Soil types
Have you ever noticed how many different colours and textures soil can have? Even if you are just walking around your school grounds, you may come across many different types of soil.
This is because soil is made up of different particles. These particles can vary in amounts and therefore make up different types of soils.
Some particles are bigger, others are smaller whereas some are in between. A soil sample normally has a lot of particles either bigger, smaller or in between, and has a smaller portion of the other sizes.
Soil particles - Sand, silt and clay
There are 3 main types of particles which make up soil.
Clay
Silt
Sand
If the soil was formed from a very hard rock, then it has bigger particles, if it was formed from a soft rock then the particles will be smaller.
Different amounts of sand, silt and clay
AIM:
To find out how much sand, silt and clay there is in soil from two different places.
PREDICTION (what you think you will find out):
The soil from _______ will have more _______, and the soil from _______ will have more _______.
MATERIALS AND APPARATUS:
two types of soil that look different from one another and are from two different places, such as:
near the top of a slope/hill and near the bottom, or
soil from under a tree and soil from an area with wild grass
sheets of newspaper to keep the desks clean
two large see-through jars that are the same size
INSTRUCTIONS:
Collect two tins of soil from places you choose. These are samples of each kind of soil (a sample is a little bit to study).
Feel the two samples in your hand. How do they feel different? Do they smell different?
Ask for oral answers, no written answers.
Spread a teaspoonful on the white paper and look at each - in what ways do they look different?
Ask learners for oral answers. Make sure you get answers from different learners and it is not just the same learners each time.
Put your soil samples into the glass jars. Pour in water to make the jar almost full, cover the top and shake each jar to mix the soil and water.
Leave the two jars to stand until tomorrow. The jars must be kept very still because the water must not move.
In the morning you will see something like in the picture below. In each jar, the water has let the large grains settle at the bottom, the very small grains are on top, and the clay grains are so small they are still mixed with the water. You may see some plant parts floating on the water.
Your two jars will show different layers. In one jar, you might see a lot of sand, and in the other jar you might see less sand.
You will have two jars like this. The parts of your soil settle in layers.
OBSERVATIONS:
Draw the two jars showing the layers in your two sand samples. Give your drawings labels and a heading.
How could you improve this investigation?
CONCLUSION (what you learnt):
The difference between our two soil samples is:
You will see that your soil contains grains of different sizes. Some are grains of sand, some are grains that are smaller than sand, and some that are so small you can't even see them.
Sand - you know how it feels between your fingers.
Silt has much smaller grains than sand but you can still feel that it is a bit rough.
Clay has such small grains that when you rub it between your fingers it feels like paint. In fact, you can paint with it. When clay dries, it becomes hard.
Can you make pots with sand?
What kind of soil is good for making pots?
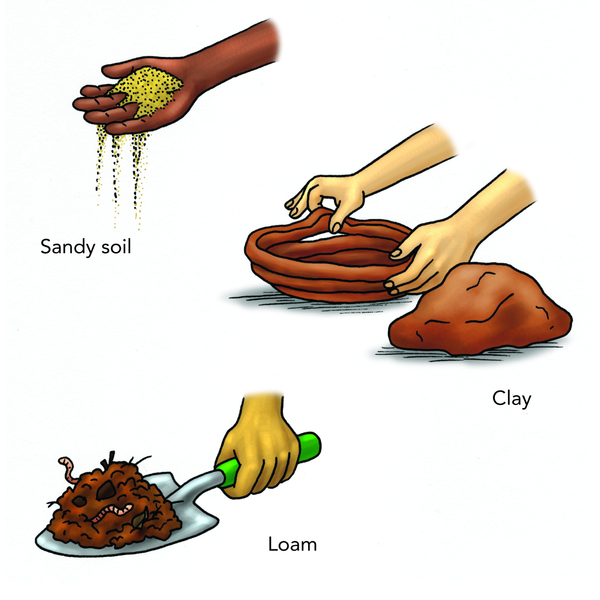
Soil types - Sand, clay and loam
As we saw previously, different soil samples collected from different places have different size particles. Imagine running along the beach and feeling the sand beneath your feet. Now imagine running through a forest over the soil. Can you see there are big differences in these types of soil?
The mixture of particles and the size of particles determines the soil type. There are 3 different types of soils:
Clay
Loam
Sand
Let's look at the characteristics of the soil types.
The types of soil
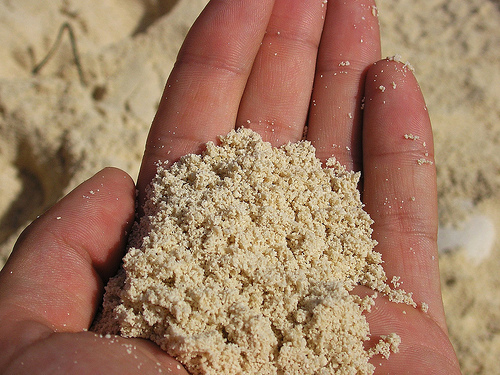
Sandy soil is the soil you find at the beach. It consists of large gritty particles and very tiny bits of rock which we call grains of sand. The grains of sand are coarse and the soil is loose.
Can you see how, in the picture of sandy soil, the grains can fall though your hand? It does not retain fertilisers. It is easily washed or blown away. On sunny days sandy soil warms up quickly. Most plants do not grow well in sandy soil.
Why do you think plants do not grow well in sandy soil?
Sandy soil does not have any nutrients. It is easily blown away so plants can not form roots or roots become exposed. Sandy soil does not retain water.
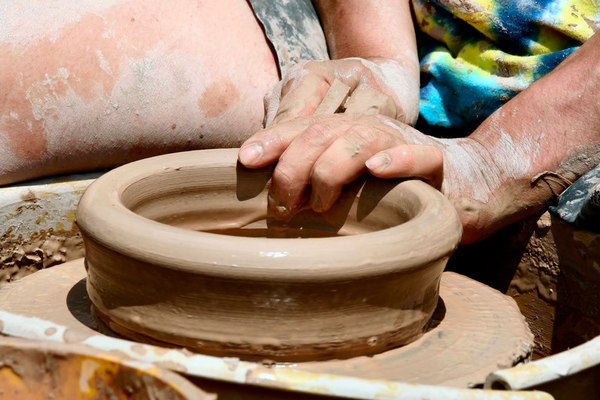
Have you ever made a pot out of clay? If you are lucky enough to have done this or seen someone do it, you will know a bit about the properties of clay.
Clay can be moulded. This is because it consists mainly of very fine particles which cling together. Clay becomes sticky when wet. It retains fertilisers for a very long time. Clay is not easily blown or washed away. It does not become as warm as sandy soil.
Clay soil consists of lots of very fine grains of clay and can be moulded into pots.
Do you think plants will be able to grow in clay?
No, not if the soil only consists of clay. This is because the clay can become waterlogged and it could pack too tightly around the roots.
Loam is a very funny word! But this is also a type of soil. Loam is actually a mixture of clay, sand and humus. Humus is organic material from plants and animals which is decomposing.
Loam is fairly loose and fertile. It retains fertilisers longer than sandy soil. It is not easily blown or washed away. It is much cooler than either sand or clayey soil. Loam soil is the best type of soil for plants to grow in!
What are the differences between loam and sand soil? Name three things that you find in loam but you do not find in sand.
Plant material, animal material, living organisms (microorganisms).
Each soil type also contains air and water, and sometimes the remains of dead organisms and very small living organisms.
How do some plants live when no rain falls?
We do know that many plants can live through the dry season, even though no rain falls for eight months. How do they do it?
Soil holds water
MATERIALS:
aspade
a large sheet of clear plastic
a few bricks
INSTRUCTIONS:
Look at the picture below.
Dig a hole in the soil outside, like this.
Cover the hole with a sheet of clear plastic and hold it down with some bricks.
After a short time, you can see drops of water on the plastic.
Dig a hole in the soil, and cover it with a clear plastic sheet.
QUESTIONS:
Are the drops on the top or the bottom of the plastic?
The drops are on the bottom, nearest the soil.
Where is the water coming from?
The water is coming from the soil.
How did the water get into the soil?
from the rain
Some plants can live even when no rain falls. How do they live?
Their roots can absorb water in the soil. Some plants have roots that do this very well, so they can live in dry places.
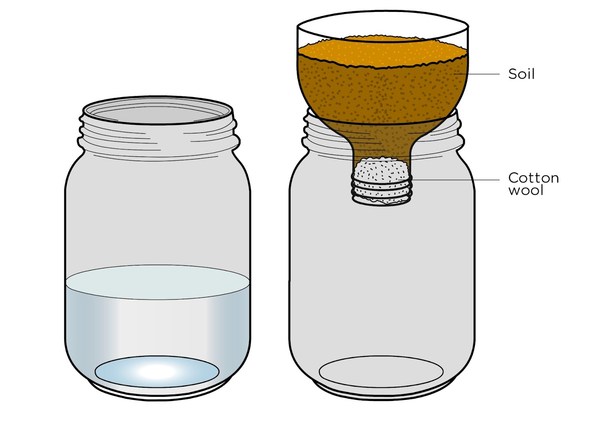
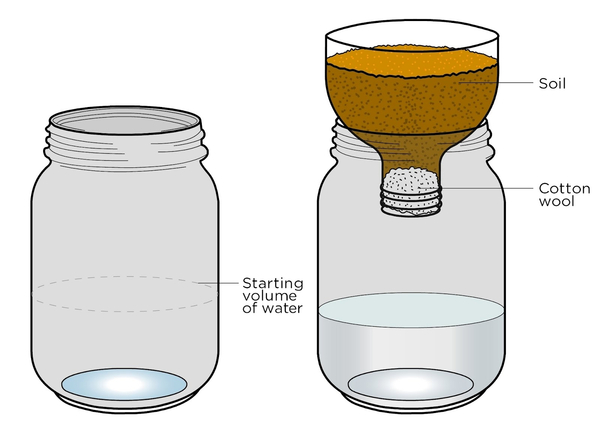
Farmers know that soils are not all the same. They know that some soils hold water well, and other soils do not hold water well.
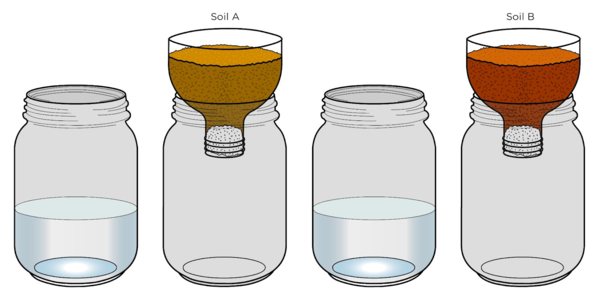
An easy way to see how well soil holds water is to pour some water into soil and let it run through into a bottle. Look at the first picture below. These two bottles are the same size. In the next picture, the water is poured into the jar with the soil in it. Look at the last picture - has all the water run through the soil?
Put the soil in a funnel, like this. Use two jars the same size.Slowly pour the water onto the soil, and wait 5 minutes.Has all the water run through the soil?
Let's do an investigation to see how much water the different soil types can hold. For this investigation activity you need two different kinds of soil, from two different places. Let us call them Soil A and Soil B.
Try and get samples of different soil types - i.e. sand, clay and loam soil. For the following investigation, the learners will have to plan some of it themselves and will not be told step-by-step what to do. If you want to, you can make the investigation include all three different soil types if you manage to get samples from each, and then you will have Soil A, B and C.
Plan an investigation to compare Soil A, Soil B, and then do the investigation. The main question you must answer is: which soil holds more water?
Which soil holds more water, Soil A or Soil B?
When you compare things, you must be fair. For example, if we want to compare runners in Gr. 5 athletics, we must let them run on the same track. It is not fair if we let some of them run through bushes but the others can run on a smooth track! To be able to compare them all fairly, we must treat all the runners in the same way.
Set up the soils as you see in the picture below; in funnel A, the soil will hold some of the water you pour in. In funnel B, the other soil will also hold some of the water you pour in. But will they hold the same amounts?
Setup the soils in two funnels like this.
How will you ensure that you are being fair?
Teacher note: The learners should realise that the amount of water and the amount of soil in each case should be the same to make it a fair test.
AIM (What you want to find out):
PREDICTION/HYPOTHESIS (What you think will happen):
MATERIALS AND APPARATUS (what you will need):
Look at the pictures above to help you write a list in the space below.
METHOD (What you must do):
Write out the instructions for how to carry out this investigation below. Remember to number the steps.
RESULTS AND OBSERVATIONS:
What did you observe when doing this experiment?
Use the space below to draw a bar graph to show your results from this experiment. Remember to label the axes of your graph and give it a heading.
A bar graph is used as we are comparing two different things (soil A and B) and they are not related to each other. The "Soil type" will go on the x-axis and the "Amount of water held by soil" will go on the y-axis, probably measured in millilitres.
How you could do this investigation better?
CONCLUSION (What you learnt):
Write a sentence where you give a conclusion about what you learnt from this investigation. see if you can identify what types of soil Soil A and B were.
For example, I learnt that the soil from the bottom of the hill holds more water than the soil from the top of the hill. Also ask learners to identify what types of soil they think Soil A and B are.
Sandy soil does not hold much water. Clay soil holds too much water. Clay holds water because it has very small grains. The grains fit together tightly. Loam soil has a mixture of sand and clay, along with composted plant and animal substances. So, loam soil holds water well, but does not become waterlogged like clay soil.
Why does sand let the water run through quickly?
You are asking the children to make a hypothesis based on the information about the size of the grains. Sand grains are much larger than clay grains, and so they don't fit together so tightly and so there is more space for the water to run through.
Which soil type do plants grow best in?
Now that we have looked at how different soil types hold different amounts of water, let's compare how well plants grow in the different soil types. You might have grown seedlings before, in Life and Living, but let's do it again. This time we will focus on the type of soil.
Compare how well plants grow in different kinds of soil
AIM (What you want to find out):
PREDICTION/HYPOTHESIS (What you think will happen):
MATERIALS AND APPARATUS:
3large jam tins
packet of radish seeds
some sand, enough to fill one tin
some loam soil, enough to fill a tin. You can find loam soil in a vegetable garden
some clay soil, enough to fill the last tin (if you have access to clay soil)
a ruler
a measuring cup
a table spoon
We use radish seeds because they germinate very quickly. Also, they are so small that they soon need substances from the soil to continue growing. In the tin with sand, they will not get those substances and they will soon begin to die. In the loam soil, your learners may get several good radishes. A radish is a root vegetable that has a sharp hot taste. If you cannot find clay soil, then just do the investigation using sand and loam soil which are easier to obtain.
METHOD:
Make five small holes in the bottom of each tin, so that water can drain out if there is too much water in the tin.
Fill one tin with sand, one tin with the loam soil, and the last tin with clay soil.
Plant 10 radish seeds in each tin. Cover the seeds by sprinkling a little of the sand or soil over them.
Pour a cup of water into each tin. Remember to keep the amount of water constant to make it a fair test.
Now let the seeds begin to grow, perhaps on the windowsill in the classroom to make sure that they have a light source.
Each day, give each tin a tablespoon of water.
Observe the radish seeds growing for a week, and compare them.
Measure the height of the radish plants growing in each type of soil. Calculate the average seedling height for each soil type.
Record your results in a table.
To calculate the average height, learners must measure the height of each seedling for a soil type, add all the heights together and then divide by the number of seedlings that have grown for that soil type. They must do this for each soil type.
RESULTS AND OBSERVATIONS:
Use the space below to draw a table to record your results from measuring the height of the seedlings each day. Give your table a heading.
Learners may need help with this. Perhaps draw a table on the board like the one given below:
Average height grown by seedlings in different soil types.
Date
Loam soil (mm)
Sandy soil (mm)
Clay soil (mm)
Now draw graphs to compare your results. A table is one way of presenting results, but a graph gives a visual representation which is sometimes easier to quickly understand and compare the results from an experiment.
First draw a line graph to show the change in average height of the seedlings grown in loam soil over time.
A line graph is used as we are showing the change over time of one thing. The input, independent variable is the day and this goes on the x-axis. The output, dependent variable is the average height grown and this goes on the y-axis.
Next, draw a bar graph to compare the average height of the seedlings on the last day of your investigation for each soil type used.
As with the previous bar graph, a bar graph must be drawn as there are 3 different things being tested which are not related to each other (the different soil types). Soil type goes on the x-axis and Height grown goes on the y-axis, in centimetres or millimetres.
How could you improve this investigation?
CONCLUSION:
Write a conclusion for this investigation. Remember, in a conclusion you must answer the question which you set out to investigate at the start.
The rocks on the surface of the Earth form a crust that covers the whole planet.
The continents are part of the crust, and the bottom of the oceans are part of the crust too.
Rocks break up into small grains.
The remains of living things mix with the grains and together they form soil.
Three types of soil are sandy soil, clay soil and loam soil.
Label the layers of Earth on following diagram:
Labels: crust, mantle, core
What is the crust of the Earth made of?
Use some words from the word box to complete the sentences in questions 3 to 6. Write out the whole sentence each time.
Word box:
sand
clay
silt
photosynthesis
animals
topsoil
subsoil
food
loam
rocks and soil
The weathered rock becomes part of the soil. The big and small grains of rock mix with parts of dead plants and _____. This mixture is called topsoil. _____ can hold water that plants need.
animals, Topsoil
Loam soil is topsoil. It has a good mixture of _____ soil. _____ holds enough water for most plants, not too much and not too little.
sand, silt and clay, Loam
Plants need the nutrients in topsoil to make food by the process of _____. Plants are food for most animals. Some of these animals are food for meat-eating animals. So without _____ there will be no plants and no animals.
photosynthesis, topsoil
We have to stop topsoil washing away when it rains because we need _____ to grow _____ .
topsoil, food
What is humus and where would you find it?
Humus is the remains of dead organisms (plants and animals) that have started to decay. It is found in the topsoil, particularly in loam soil.
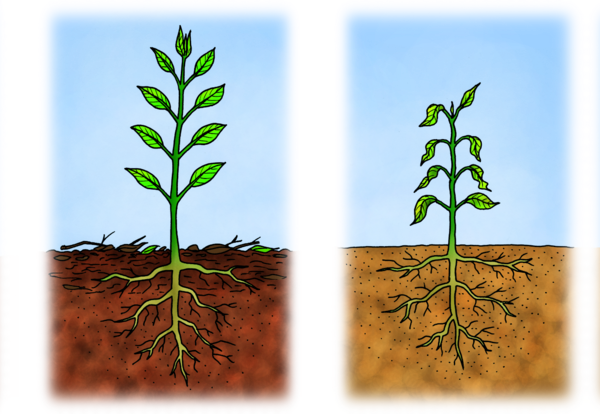
Look at the picture below of two different plants growing. Why do you think the one plant is healthier than the other plant? Explain your answer.
The difference has to do with the type of soil that each plant is growing in. The plant on the left is growing in rich loam soil. It can therefore get nutrients from the soil and also water as loam soil has a high water holding capacity. The plant on the right is growing in poor sandy soil which does not have many nutrients. Sandy soil also cannot hold water well as it has coarse particles so the water just runs through. The plant therefore is not getting enough water and is wilting.