


Do you think that there could be living things on Mars? What do living things need to go on living?
Water, something to feed on for energy, and perhaps they need oxygen.
How to introduce this topic:
There is a strategic reason for placing this technology project on systems to explore the Moon and Mars here: if we leave this unit to the last 2 weeks of the year, the children will probably not get the experience of doing a technology project. They may just make a thing with wheels, in their own time, perhaps at home, and that is not technology.
The educational value in technology lies in the investigating, thinking and designing that children must do. Technology aims to make children capable; capability means the children's ability to turn thinking into doing and completing. When they learn new science knowledge, the learning has a purpose: they must use that knowledge in producing good designs. when they have made a product, they should be able to explain to you all the reasons why they designed it like that (even if they could not make it in the way they wanted to).
So some very important learning happens during a technology project, and you need to guide them through all the stages. That's why we don't leave technology projects for the last weeks of the year.
If you trained as a technology teacher, you will recognise the NCS pattern of technology projects - do you remember IDMEC? You can remind the learners of this:
I stands for investigating the problem which some people have, investigating existing products, and investigating concepts and skills that you will need to solve the problem.
D stands for designing - that means using what you learnt from investigations to think of good ways to solve the problem.
M stands for making - when you make your model, you use materials and tools, you make your model look good, and you show the teacher what you learnt in your investigating." (notice that most children design with their hands, not only with pencil and paper. As they work with materials they get more ideas, and their design improves. As a result, we should expect them to go back and forth between designing and making. It's really all the same stage of a project.)
E stands for evaluating - after you have made your model to solve the problem, you have to ask, does it work? is this what the people wanted? could we make a better one?
C stands for communicating - you must show other people how you decided on your solution to the problem. you need to write and draw your ideas." (the learners should be drawing and writing all through the project. don't leave the writing to the end, because they find it boring at that stage. When they are getting new ideas they often enjoy writing because they are writing about their own ideas; this is a great strength of technology in school. a technology project gives the children reasons for reading and reasons for writing. and so - this is very important - we can address the literacy problem through the subject of Natural Science and Technology.)
No humans have ever been to Mars but scientists know a lot about the surface of Mars. You learnt about this planet in the first chapter. They have found out what Mars is like by using vehicles called rovers that send back information to Earth. Let's have a look at some of these different rovers and how they operate.
In 1997, the Pathfinder spacecraft landed on Mars. It had a small rover inside; the Pathfinder opened up and the rover came out and began taking photographs of Mars. Look at the picture below. The photo is not very clear but remember that it was taken with a robot camera; that camera sent the picture by radio signals, back to Earth.
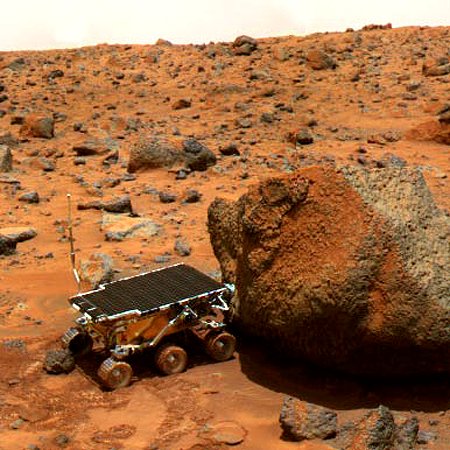
The driver of the rover was millions of kilometres away on Earth and used radio signals to steer the rover.
The Pathfinder rover used electric motors to move. The electricity for the motors came from photovoltaic (solar) panels on its top surface. Solar panels transfer energy from sunlight to the electric motors. Find the solar panels in the photo. The solar panels that you learnt about in Energy and Change last term are also photovoltaic panels.
The rover was about 630 mm long and 480 mm wide. Imagine you are looking down at the top of the rover. Use your ruler to draw a rectangle that size on the board. Then draw the wheels you could see.
Let a learner representative from three groups each do a drawing on the board at the same time; the class will be interested to see who does it best. A good answer will show a rectangle 630 mm x 480 mm, and then six small rectangles for the wheels. From the top, the wheels will not be circles - let the learners confirm this by looking down at a shoe polish tin or snuffbox.
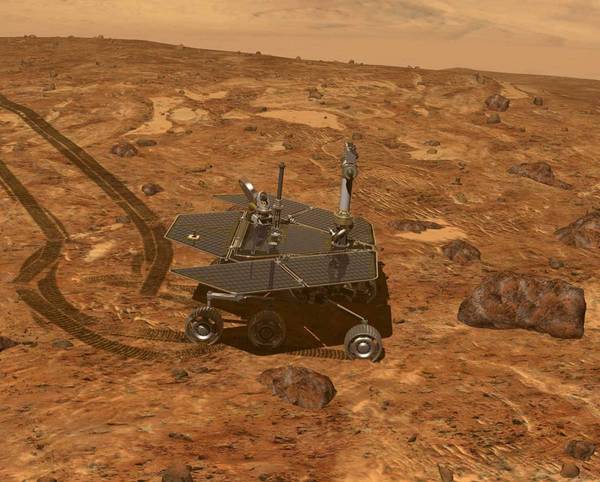
These two rovers landed on Mars in 2004. Like Pathfinder, they also used solar panels that generate electricity from sunlight. In 2010, after 6 years, the rover called Spirit got stuck in sand. Soon after this it stopped sending back messages.
The rover called Opportunity is still working, after 9 years on Mars! It has travelled over 35 km and sent back thousands of pictures.
This rover is the size of a small car and will be able to travel further and collect much more information about the surface of Mars. Scientists want to know whether there are any living things on other planets. So the rover will look for signs that microorganisms lived on Mars a long time ago. Microorganisms are very tiny organisms that cannot be seen by the eye. They are so small that millions would fit onto the tip of a needle.
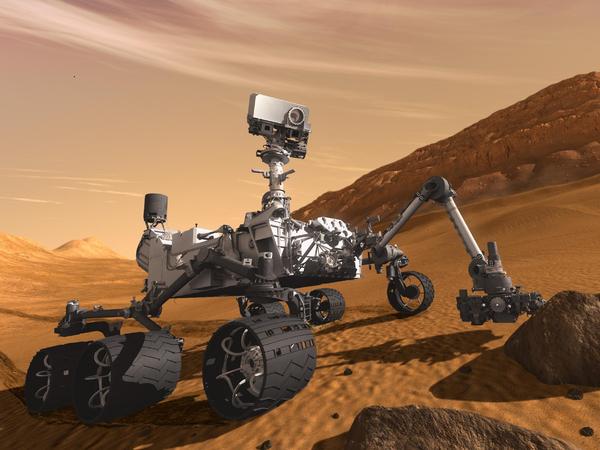
The rover has video cameras to show the driver back on Earth what is in front of the rover, and it has a long arm with a scoop to pick up soil samples. It also has a laser that can heat rock until it turns into vapour. Then special cameras look at the vapour and find out what substances are in the vapour. Can you see the cameras in the picture?
Do you think that there could be living things on Mars? What do living things need to go on living?
Water, something to feed on for energy, and perhaps they need oxygen.
INSTRUCTIONS:
QUESTIONS:
We know that wheels are round. Why do these wheels look like rectangles?
The wheels look rectangular because we are seeing them in front view, not side view. Learners will need to know about front, side and top views for drawing in Technology.
Learners can use a piece of string as a compass; they tie a knot at one end and hold the chalk at half of the diameter. For example, to draw a circle with 30 cm diameter, the chalk must be 15 cm from the knot. Then they keep the knot in one spot on the board and move the chalk all around the knot. The string keeps the chalk at 15 cm from the knot. The knot is on the centre of the circle, the length of the string is the radius (i.e. 15 cm), the path of the chalk is the circumference and the distance across the circle, through the centre, is the diameter (two times the radius).
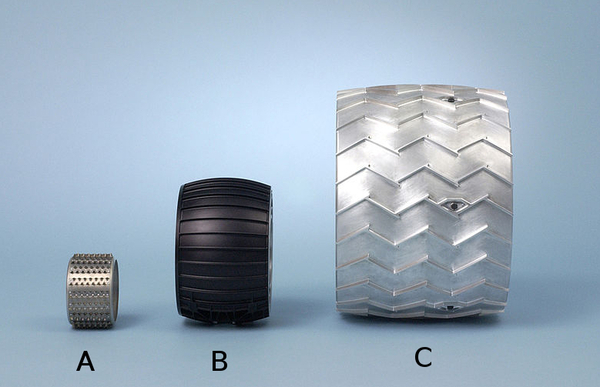
The wheels shown belong to the rovers, Pathfinder, Opportunity and Curiosity. Match the wheels to the rovers. Write the letters A, B and C below with the name of the rover next to it.
A: Pathfinder
B: Opportunity
C: Curiosity
Why are the wheels different diameters?
The wheels are different sizes because the rover cars have gotten bigger and bigger, so they need bigger wheels.
Why did the designers choose such wide wheels?
The designers probably chose wide wheels because the surface of Mars is sandy. A narrow wheel, like a bicycle wheel, would sink into the sand.
Use your ruler and work with the picture of the 3 wheels. Measure the diameter of each wheel in the picture and the width of each wheel. Write your measurements into this table.
|
Diameter of wheel |
Width of wheel |
|
|
Pathfinder |
||
|
Opportunity |
||
|
Curiosity |
What is the pattern that you find? Write out the whole sentence The bigger the diameter, the ...
The bigger the diameter, the wider the wheel. They can see the pattern in the picture, but they need to learn the language for describing patterns: The bigger..., the wider...
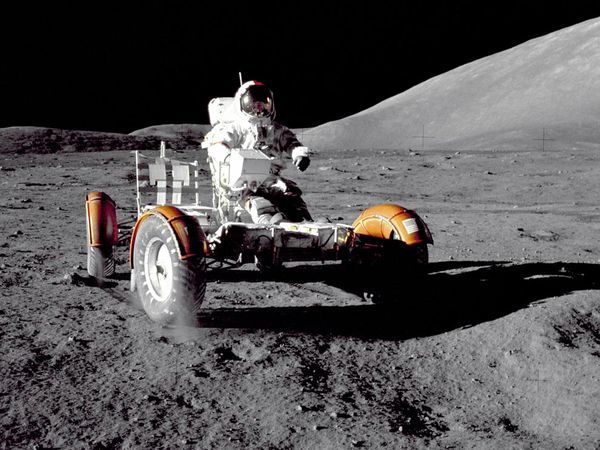
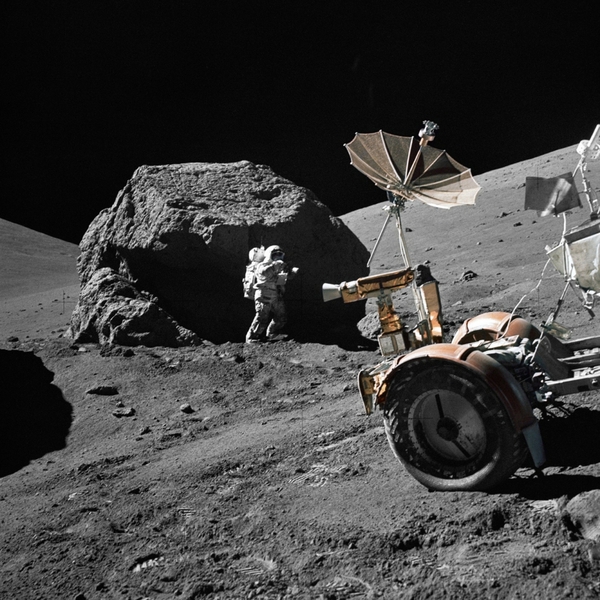
Apollo 11 mission astronauts walked around on the Moon. This was the first time. But for Apollo 15, 16 and 17 each mission had a lunar rover called a Moon buggy. Lunar means "relating to the Moon".
Look at the picture of the lunar rover. This vehicle went to the Moon in 1972 and it is still there. Other spacecraft photographed it in 2011. You will find out more about this rover when you investigate rovers for your Technology project.
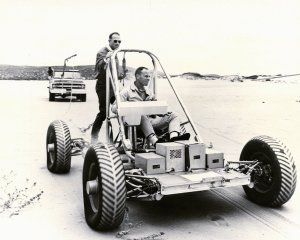
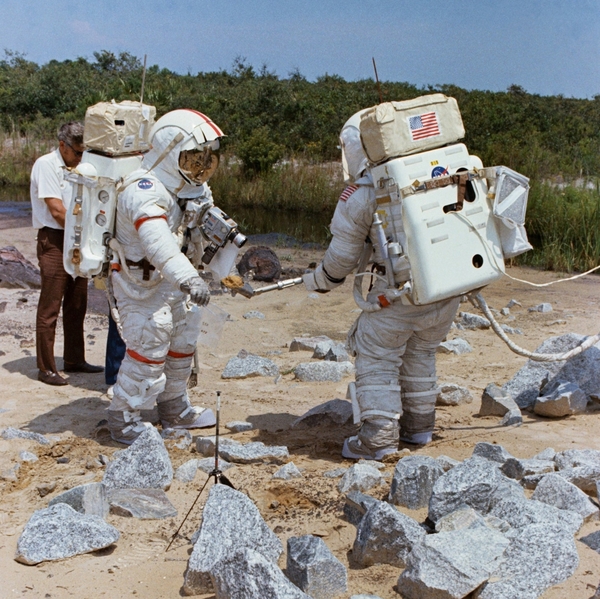
Below is a photograph of astronauts testing out a lunar rover on Earth before they used it on the surface of the Moon.
Do you remember how, in the last term of Gr. 4, you were on your way to the Moon with the Thunderbolt Kids? You are now part of a crew in the Apollo scientific mission.
Set the scenario of a mission to collect Moon rocks. This follows on from the Gr. 4 Technology project where the task was to design and build a rocket to get to the Moon.
Your mission is to collect rocks from the Moon. Scientists back on Earth want to study those rocks and find out whether they are the same as rocks on Earth. You have to collect from different places on the Moon so you need to be able to move around on the surface.
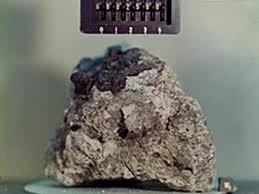
In 1972, scientists really did go to the Moon to collect rocks. In the picture you see a photo of one of the rocks that came back to Earth with the Apollo 16 Mission.
The Sun heats the Moon's surface to the temperature of boiling water so you will have to wear a special suit to protect you and cool you. The suit will make it difficult to work and walk.
The Moon has no air, so you will have to carry air for yourself in tanks (bottles). To do all this work, you will need a vehicle to move around on the Moon. The vehicle is called a rover.
A Design brief for a Technology project is a short statement of what you are going to make, why you are going to make it and what you are going to make it for.
Question:
Write your Design brief in the space below using the following phrases:
"....the Moon"
Now that you have specified your Design brief for your project,we need to do some more investigating to answer some questions before we can start designing.
In Chapter 3, you learnt about the Moon. The rover needs to be able to drive over the Moon's surface, so we must investigate what the surface of the Moon is like.
Write one fact about the Moon that you must think about when you design your rover. Write a sentence to explain why that fact is important.
For example, the Moon is covered in loose dust (so the wheels must not sink in and get stuck). The Moon has craters (so the Moon rover must be able to go into a crater and come out again). There is no air on the Moon so a petrol engine will not work in the rover.
The rover on the Moon had four electric motors; one motor in each wheel. It did not need a steering wheel, because the driver can switch the motors on and off in each wheel. This steers the vehicle. It had two seats with seat-belts.

The part that looks like an umbrella is an aerial that picked up radio messages from Earth. Can you see this in the picture? It looks a bit like a satellite dish you see on some houses for television.
How do you think the rover got energy to work the motors in the wheels?
It had to carry batteries to provide energy to the motors.
The rover was made of very light materials. Why did the rover have to be light?
Firstly, a rocket had to lift it off the Earth to go to the Moon; secondly, a light vehicle could work on smaller batteries.
Why did the wheels have shields over them? The shields are the orange things over the wheels.
The tyres could throw up small stones that could do damage.
The wheels of the rover were quite wide. What would happen if the wheels were narrow like a bicycle wheel?
The wheels would sink into the sand and get stuck.
Why must cars on Earth have headlights?
Cars on Earth have headlights so that the drivers can see the road at night.
Do you think the rover needed headlights?
No, the astronauts worked in full sunlight.
Your Moon rover needs energy to make it move. Do you remember that in Gr. 5 we looked at Energy and Movement when doing Energy and Change?
Of course, Sophie! This is also quite a difficult topic and you will learn more about it in later grades, so let's refresh some of these terms.
When you stretch an elastic you transfer energy to it, called stored energy. Another way of saying this is that you give the elastic potential energy. This means it has the potential to do work. Or in other words, in the future the stretched elastic band can do something.
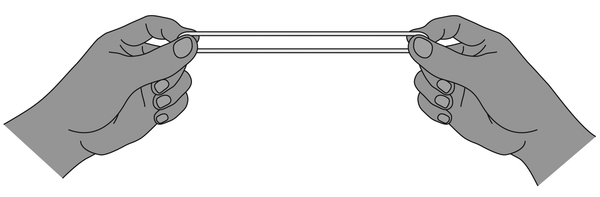
When you let the stretched elastic band go, it now moves as it springs back. This is movement energy, and is also called kinetic energy. Kinetic means movement. The potential energy stored in the stretched elastic band changed into kinetic energy as the elastic band was released and moved.
Now let's apply these terms to the rover. You can also give something potential energy by lifting it up off the ground as it then has the potential to fall or move back to the ground. You can give energy to your Moon rover if you lift it up on a plank, as you see in this picture.
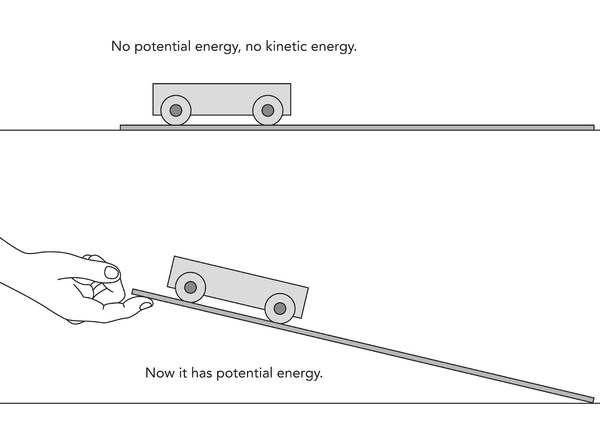
When you lift up the plank and rover, your hand gives some of your energy to the rover. It now has potential energy to move.
When you let the rover go, what will happen? Use the words "kinetic energy" in your answer.
The rover will lose potential energy and gain kinetic energy as it moves down the ramp. This might be quite difficult for some learners to answer if they have still not understood the topics. Perhaps answer the question as a class discussion.
The plank is useful for testing the wheels of your model. But the rover must be able to go up hills, not only down them.
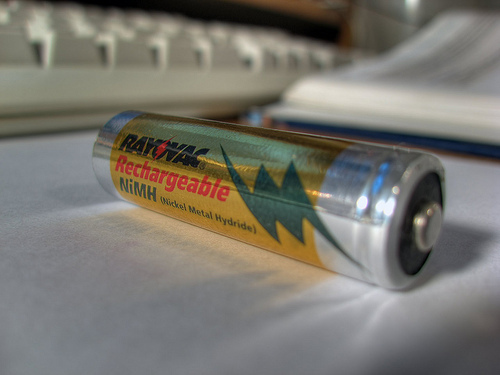
The second way to give your rover energy to move is to use an electric motor and battery. Do you remember last term we looked at electric circuits and the source of energy for a circuit is a cell or battery? You can fit an electric motor and a battery to your rover. The potential energy in that system is in the battery.
Another way to make your rover move on the Moon is to use a rocket. Rockets will work on the Moon. Inside the rocket, gas pushes against all the sides. Some gas pushes against the walls of the balloon and some gas pushes out through the opening of the balloon.
Look at the rocket car in the picture. The gas pushing through the opening of the balloon pushes the whole car forward.
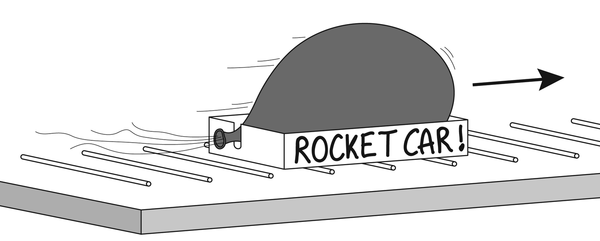
This rocket is on rollers. Could you fit wheels to this car?
The real Moon rovers had batteries and electric motors in each wheel. Many electric cars have a motor. This motor can give energy to your Moon rover.
Your Moon rover needs a body for the scientists to sit on and to put the rocks into. The body of a vehicle must have good ways to hold the wheels.
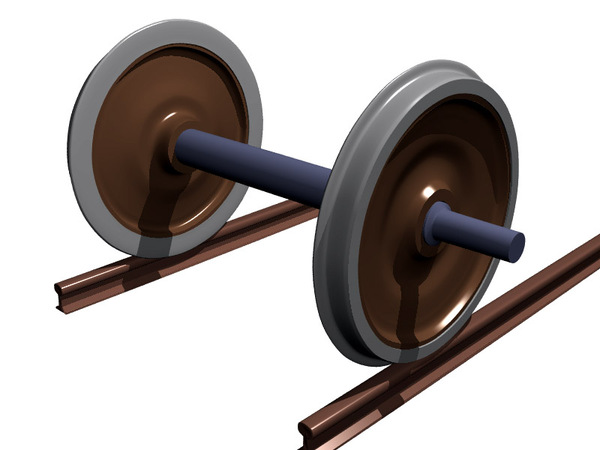
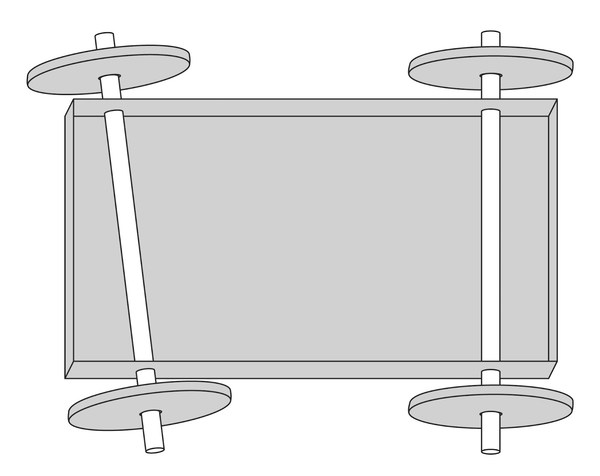
We looked at wheels and axles in Gr. 5 in Energy and Change. A wheel fits onto an axle, which is a solid rod or bar that allows the wheels to turn.
Label the two wheels and the axle in the following diagram.
You know there are different ways to let wheels turn on an axle. One way is to have the axle fixed to the body, and the wheels are free to turn on the axle. What is the other way to let wheels turn?
1) Wheels fixed to the axle
You can use plastic straws or the barrel of a ballpoint pen to make a bearing for an axle. The picture shows you two ways to fix the bearings onto the body. The bearing is the hollow tube that the axle goes through. The bearing must be bigger than the axle so that the axle can turn easily.

What are the two ways used in the picture to fix the bearing onto the body?
Tape and glue
What are some materials that you could use to make the axle in the above picture?
Smaller straws, dowel sticks, sosatie sticks, etc.
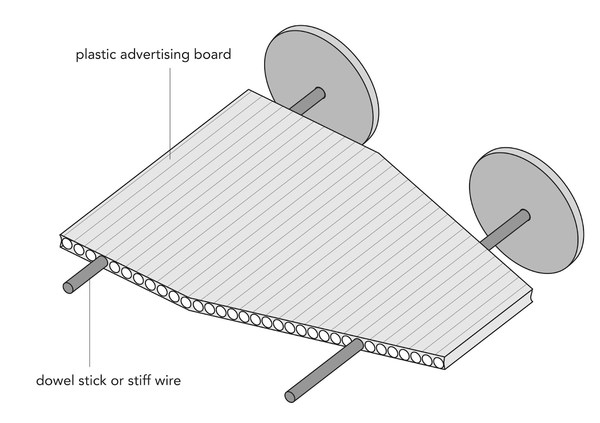
You can also use plastic signboard or strong corrugated cardboard to make a body with wheels. Can you see how the axle goes through the holes in the cardboard?
2) Wheels turn on the axle
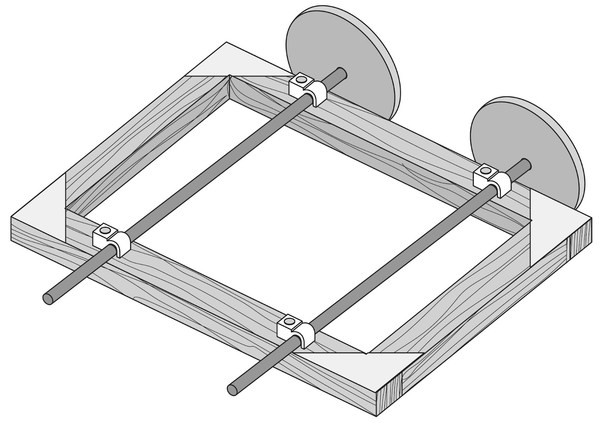
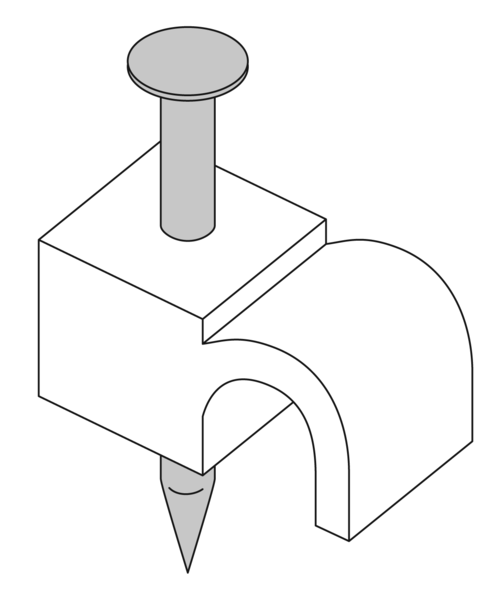
The next picture shows you another way to let the wheels turn. This time the axle remains still and the wheels turn on the axle. The axle is fastened to a wooden body with cable clips. Cable clips fasten telephone cables to walls. Can you see the blown up version of a cable clip? The clips may hold the axle tightly, so the wheels must be free to rotate.

Your Moon rover can look different to the Apollo rovers.

The Apollo engineers designed other rovers, but in the end they chose this design. Your design will look different to their designs.
SPECIFICATIONS ( what your rover must be like):
CONSTRAINTS:
DESIGN:
Leave some space at the bottom for a second design. When you begin making the rover, you will get better ideas. Then you can draw another picture of your design. The two pictures will show how your ideas changed.
MATERIALS:
Things to collect for wheels:
Things to collect for axles:
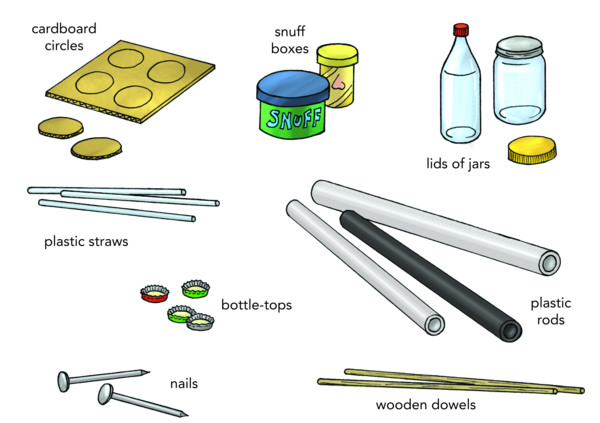
Tools and materials you need as a class:
MAKE:
Now let's make the rover. Below are some tips which will help you when making your rover. Remember that you may not have the perfect design from the start! So when making your rover, you need to go back and modify your design as you find things which work and do not work.
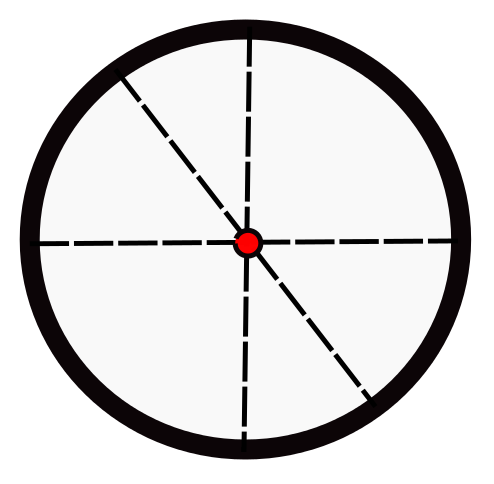
1. How to find the centre of a wheel (remember, a wheel is a circle)
2. How to make the right size hole in the centre
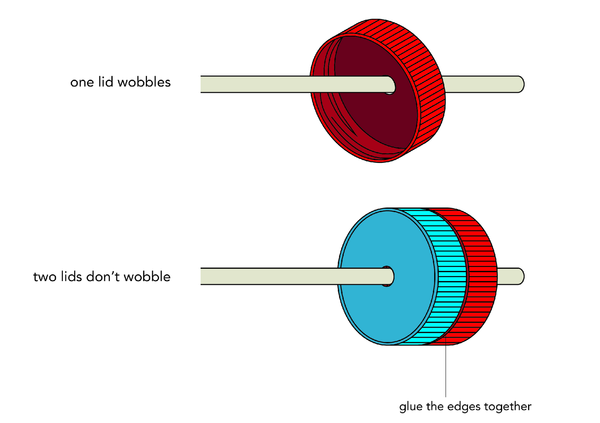
3. How to stop wheels wobbling on their axles
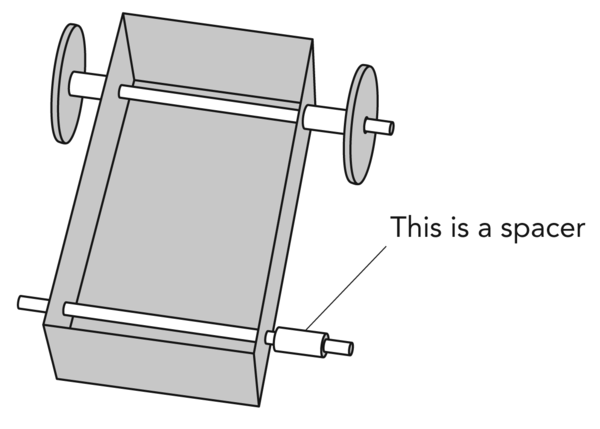
4. Does the wheel rub against the body of the rover?
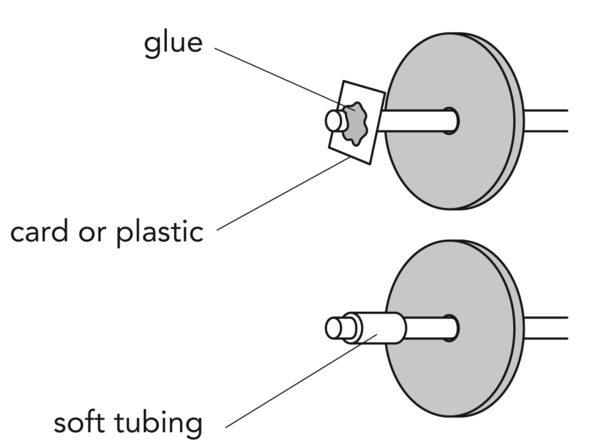
5. Does the wheel come off the axle?
6. Does the rover not run in a straight line?
Test your rover and make it run as well as you can. Go back and draw your improved design. Draw the rover you have made and write labels to explain what all the parts do. For example, you can write "This piece of straw stops the wheel rubbing against the body."
EVALUATE:
At this point in a technology project, you stop and ask yourself, did we do a good project? Did we make something that solves the problem?
Clear an area in the classroom to show the class's Moon rovers. Show your group's Moon rover. Show how it moves by itself or how it rolls down a sloping plank.
Discuss these questions in the class for each Moon rover:
Write down how far each Moon rover from each group can go after it rolls down the plank. You now need to draw a bar graph to present this data (information) in the space below. Your teacher will help you to get started and then you can finish drawing it yourself.
Take the learners through how to draw a bar graph, step by step. Explain why a bar graph is used and not a line graph for example. A line graph is used when a single variable is tracked against a series of known quantities. For example, in this case, if learners were to use one rover and test how far it went when they changed the angle of the plank, then a line graph would be used. You can do this as an extension to show the difference between the graphs.
On the other hand, a bar graph is used when there are two or more things being measured or counted. In this case all the rovers are being measured. They are not related to each other so you cannot draw a line between the points. But rather a bar graph is used to compare the measurement for each object.
The objects being measured must go along the horizontal x-axis (independent variable) and the distance moved must go on the vertical y-axis (dependent variable). You can assign each group a number to plot on the x-axis or allow them to come up with their own names for their rovers.
Record all the results in a table on the board with the group name/number in the first column and the distance moved in the second column. You can then draw the axes for the graph next to this table so that learners can see that the information from the table is now presented differently as a graph, but it is the same information. You can draw the bar for the first group and then let the class finish drawing the other bars. Make sure to walk around the class while learners are completing this.
Although learners do not need to know the terms independent and dependent variable, they need to start learning about different types of graphs as they often battle with this in the later grades.
After you have tested and evaluated everyone's rovers as a class, use the following space to write an evaluation of your own rover. Remember to answer the questions above when evaluating how successful your rover is.
Below is a summary of some of the things that we learnt from doing this project:
Pathfinder, Opportunity, Curiosity, or Spirit
Curiosity
They need them so that they can cover greater distances. They also collect rock samples and so they need the rovers to carry the samples back to their spacecraft.
Rovers used on the Moon are driven by people on the actual rover. People have never been to Mars so these vehicles are operated by people back on Earth.
An axle
Learner dependent answer
This is a learner dependent answer. (Answers can include something about looking for signs of other life, discovering what makes Earth unique, pure scientific interest, etc.)
