


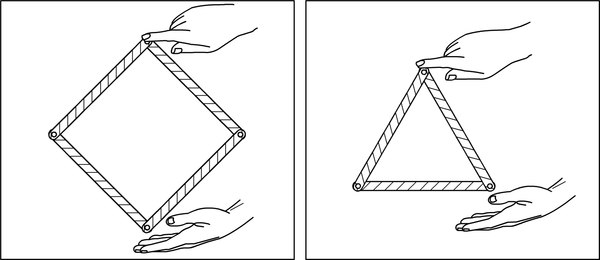
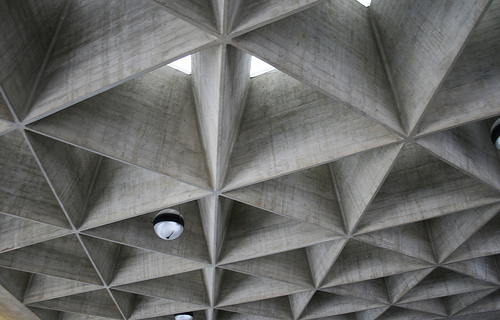
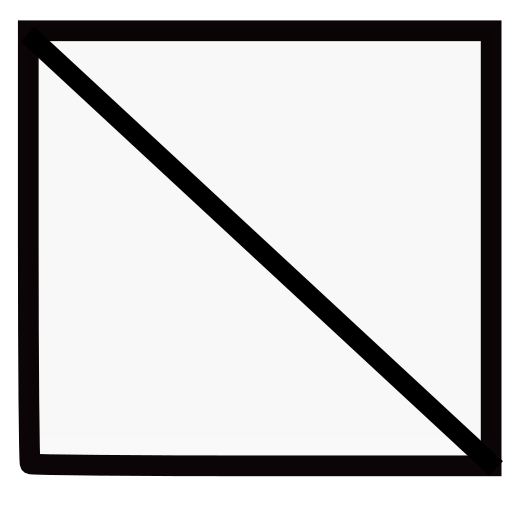
Which shape lost its shape (collapsed) when you pressed on the corner?
Square
In the previous chapter we saw how to strengthen a material to build a strong structure, such as folding and creating tubes. Now we want to look at how we can strengthen a structure. A structure is something that is arranged in a specific way and consists of different parts. A jungle gym is an example of a structure. It has many different parts such as beams, ropes, and bars.
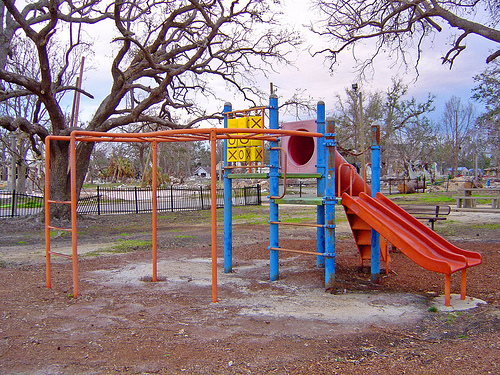
A structure is made of different parts. The way we put these parts together can make a structure strong or weak. Let's have a look at ways to join parts together.
The following activity is an investigation which will lead into the subsequent content. This activity will introduce what struts are. Make sure that the learners experience a triangle as a strong structure and a square as a weak structure.
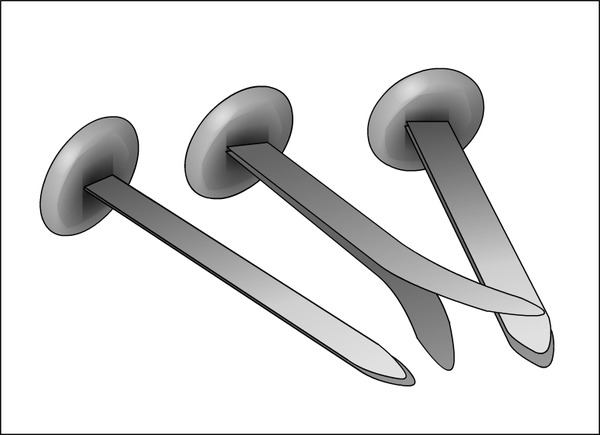
The cardboard strips can be made from cardboard boxes such as paper boxes and kept for future years. This can also be done with straws and pins, or with toothpicks and jelly-tots, or with uncooked spaghetti sticks and marshmallows.
MATERIALS:
INSTRUCTIONS:
QUESTIONS:
Which shape lost its shape (collapsed) when you pressed on the corner?
Square
How can we strengthen the shape that collapsed?
Use one strip to brace diagonally opposite corners
How many shapes are formed when the shape is strengthened with the extra piece of card?
2 shapes
What is the name of this shape?
Triangle
Which shape do you think is the strongest?
Triangle
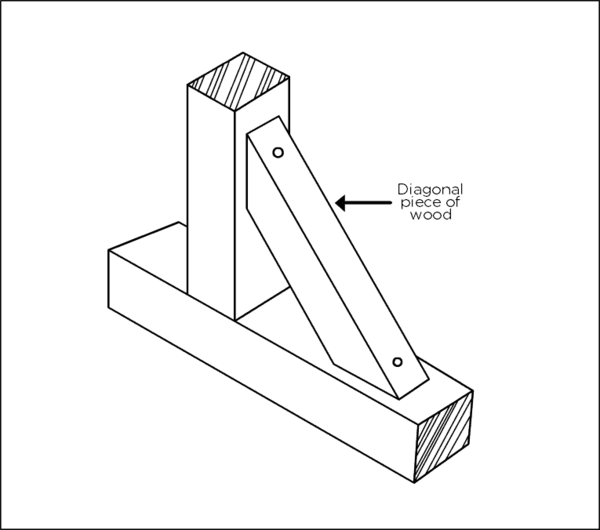
We saw in the last activity that you can make a shape stronger by putting an extra piece in place. For example, the square was much stronger after you placed an extra piece of card diagonally from one corner to the opposite. This extra diagonal piece is called a strut. The other pieces are also called struts and together they all make up a strong, stable frame.
The frame is the structure which supports the other parts. The struts strengthen the frame structure when joined in particular, stable shapes.
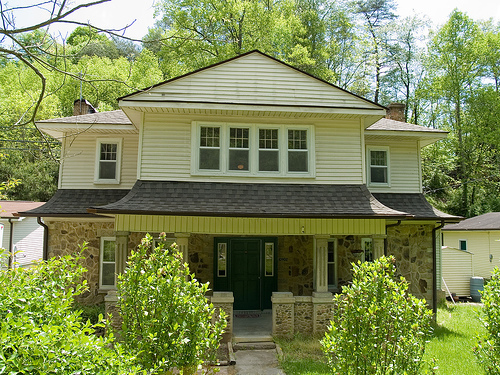
A frame is a rigid support structure that gives shape and forms support for its parts. The word rigid means stiff, not bending or changing shape. Every building, vehicle, and piece of furniture has a frame structure.
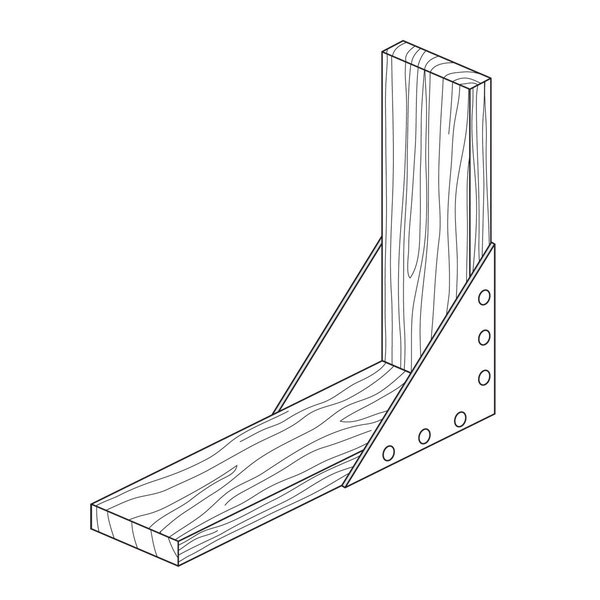
There are five struts making up this frame. Label all 5.
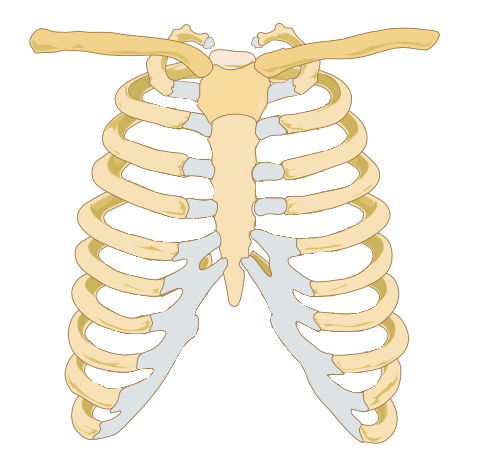
Did you know humans also have a frame structure? Can you guess?! It is our skeleton! Our skeleton consists of bones which make up the frame to support all our muscles and organs. Look at the picture below of the rib cage. It is a perfect example of a frame structure. The frame structure of the rib cage protects all the organs inside, such as the heart and lungs.
A strut
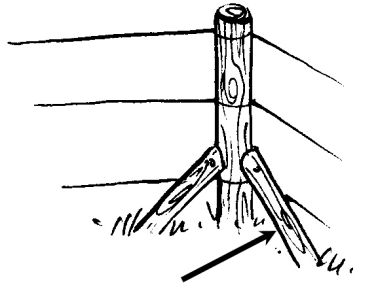
Study the picture of the struts in the fence. What properties do you think the struts need to have to do its job? For, example can the strut be made of something soft? Can the struts be flexible?
No, it cannot be made of something soft. The strut must be strong and hard to support the force from the fence. No, the strut must be stiff and not flexible as it must not bend.
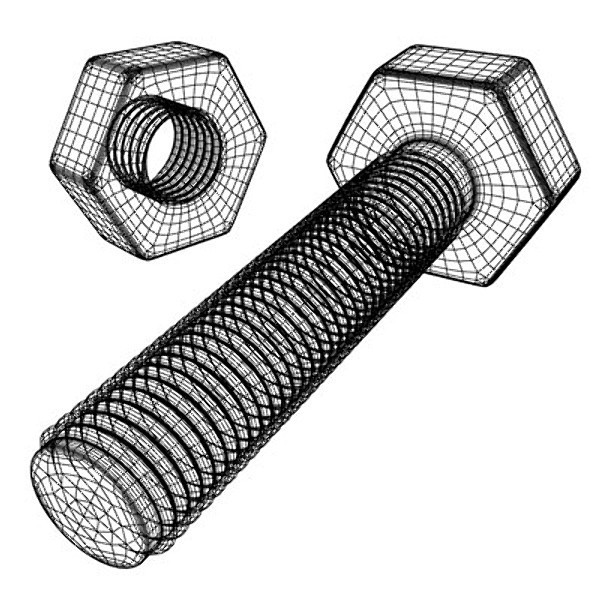
A tie is a connector that is designed to withstand tension, for example, a nut and bolt.

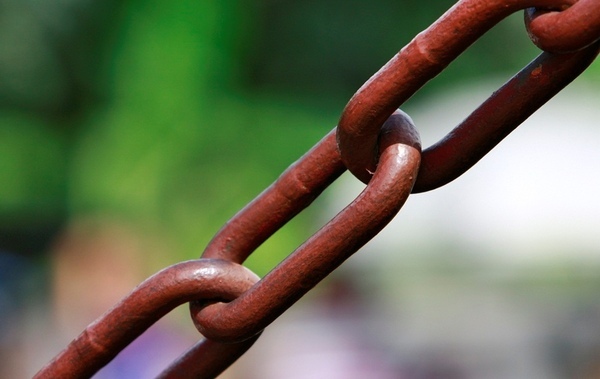
A guy is designed to withstand tension. A guy can be a rope, chain or a single wire. For example, when you put up a tent you use guy ropes to hold down the tent.
Corners of rectangles are often weak points in structures, where the structure can bend and collapse like the square in the investigation you did in the previous unit. Triangles are strong shapes, which do not collapse easily. By putting another support (called a brace) across a rectangle's corner to make a triangle, the corner is made much stronger.
We are mostly going to look at the parts of frame structures used in building something.
The following pages of pictures do not contain many exercises. The main objective is to expose the learners to different structures with have been strengthened using struts. Makes sure to go through each picture and identify the struts. Ask learners to point out the struts in the pictures and explain why they think the frame structures need to be strong and rigid.
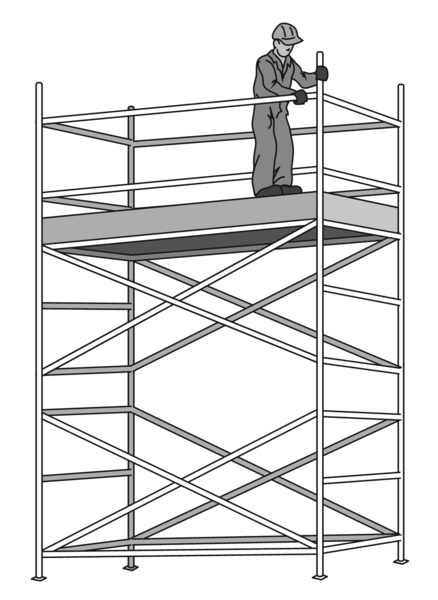
When builders need to work high above the ground, they often use a frame called scaffolding. If this didn't have any braces across it which make triangles, it could easily collapse.
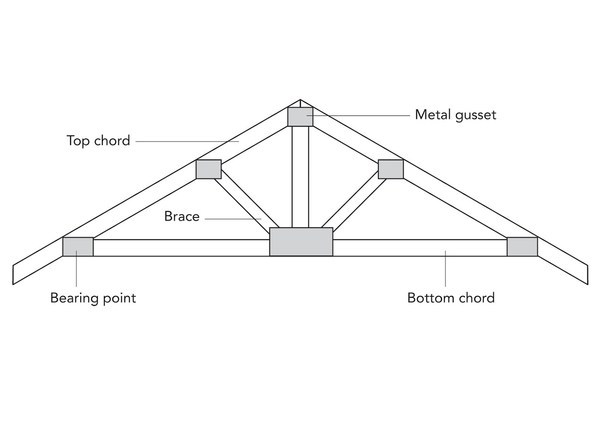
The picture below shows a roof truss. A roof truss is used to help carry the weight of the roof of a house. All of the triangles in it help make it strong.
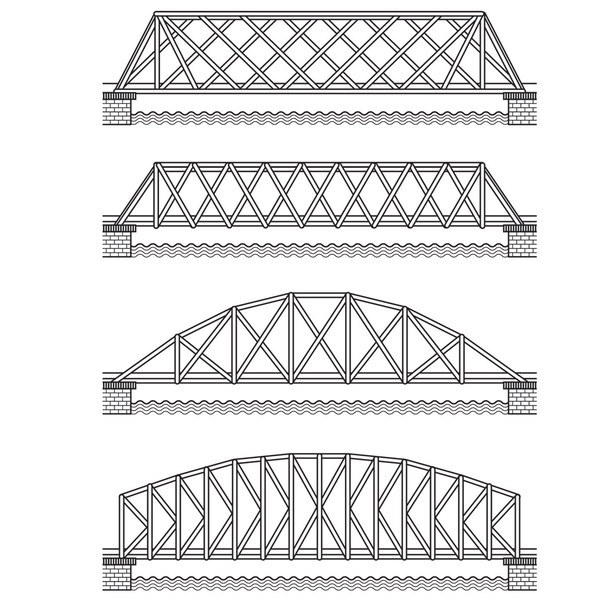
Bridges also make use of struts to make the frame stronger. The diagrams below show the use of triangles to make bridges stronger:
Why do you think bridges need to be so strong?
They need to be strong to carry all the weight of cars, trucks, trains driving over them.
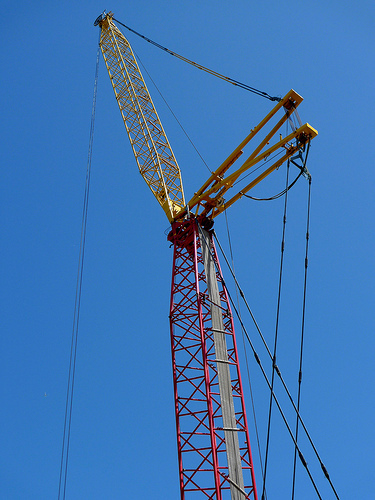
Some structures are really big and carry a lot of weight. These structures include cranes and pylons. These structures need to have a very strong frame and they therefore use struts to make them stronger. Can you see all the diagonal struts which strengthen the frames of the pylons?
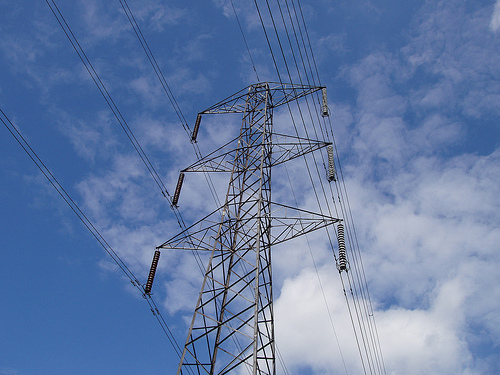

Cranes need to lift very heavy objects, but they also need to be able to move around. So, they must be as light as possible, but still very strong. A frame structure with struts is the best way to do this.
How many cranes are there in the front cover for Matter and Materials which are helping to build the soccer stadium?
two
The Thunderbolt Kids went for a walk in the forest around their school after class. Farrah wanted to find some interesting objects from nature to draw, so she had asked the others to come with her for a walk. While they were running through the forest, picking flowers and climbing trees, they came to a river. The river was quite wide and they could not cross. Sophie suggested they turn around and go back. But Tom hated having to give up when something was put in his way. He felt he could solve this problem. Jojo was running from one tree to the next to see how fast he could do it, Sophie was inspecting a small pond where some tadpoles were swimming around, and Farrah had sat down with her sketch book to draw a caterpillar crawling along a branch. Tom sat down next to the river to see if he could solve this problem of getting to the other side of the river.
Tom remembered that in class that week, they had been looking at ways to strengthen materials; making them stronger to hold a heavier load. He remembered that folding and rolling paper into a tube made it stronger. He also thought about the struts used in frame structures to make them stronger, more rigid and stable.
The next day in class Tom asked his teacher if they could design a model of a bridge to cross the river outside the school. The teacher thought this was an excellent idea and decided to set it up as a class competition: To design and make a model of a bridge to span 1 m between two desks and then test whose bridge could hold the most weight!
Let's also take part in the competition in your class and help Tom come up with the best design for a bridge to cross the river.
We are going to follow these steps when designing the bridge:
This is called the Design Process. Do you remember last term when you designed a shelter for birds? In that project, we only designed the shelter, made drawings, and then evaluated the design. Now, we are going to take this process further and actually make the bridge and then evaluate the products that we made!
This project builds on the Design Process from Life and Living in Term 1. The learners are now required to go through the whole design process. As with the scientific method, the steps of the Design Process should not be enforced and learners should not be made to memorize the steps. Rather, TEACH them the necessity for each step and that they are not set in stone. For example, if you find your design is not working when you are actually making the product, you might go right back to the beginning and do some more investigating, and then come up with a modified or completely new design. It is a flexible process. This Design project can be done as individuals or as groups, preferable small groups of 3 or 4. The aim is for learners to research different ways of building bridges, also drawing on the knowledge for this strand about ways to strengthen materials. They then have to come up with a design and make the structure in class. The aim is to make a bridge that can span a length of 1 m between two desks. After all the bridges have been built, hold a competition to see whose bridge can hold the most weight before collapsing. Start off with coins and then small books, and then heavier books. You do not want to break a bridge with the first object that you place on it, otherwise this will destroy confidence in the children. So start off with light object and progress to heavier ones, in the same order for each bridge. When you do not think the bridge can hold any more weight, stop placing objects on it. Discuss as a class how it could have been made stronger. This will be used by the learners when they have to evaluate their designs and suggest possible ways of improving the design.
If you do not want to do this design project of making a bridge, there are other options which also make use of struts to create a strong structure, such as designing a model of a tower, pylon or chair. This activity, however, will use a bridge as an example.
INVESTIGATE:
The first step is to investigate and do some research around how to build a bridge. In the chapters leading up to this, we have already looked at ways to strengthen materials and create strong structures using struts. Remember this when you are investigating and designing your bridge!
You also now need to investigate ways of building bridges. You can use books and the internet. Use the space below to write down some of your findings from your research.
DESIGN:
Now you need to use the information you have found out to come up with a design for your bridge.
Your bridge has the following specifications and constraints:
Answer these questions to formulate your Design Brief:
What do you need to design?
What will the size and shape of your bridge be? Remember that your bridge must span a gap of 1 m between two desks.
What materials are you going to use to build your bridge? Make a list of all the materials you will need.
What tools are you going to need to make your bridge?
Are there any other specifications and constraints that you can think of for your bridge?
Now you need to draw some designs for your bridge. Use scrap pieces of paper to do your first designs. Once you are happy with your design, use the space below to draw your final design. Label your drawing showing materials you are going to use for the different parts.
If learners are battling, suggest some materials to use: drinking straws, toothpicks, popsicle sticks, masking tape, thread, scissors, paperclips, straight pins, prestik, clay, paper or cardboard as well as rulers, weights and books for the testing phase.
MAKE:
Now comes the fun part! You have to make your bridge according to your sketch and using the materials you identified. Do this in class.
Once you have all finished making your bridges, set them up between 2 desks that are 1 m apart. Now, let's have some fun to test whose bridge can hold the most weight! We will only test one bridge at a time and use the same objects (bags of coins or books) to place on each bridge, adding one object at a time. This will ensure it is a fair test.
A lot of facilitation is needed at this point. Only test one bridge at a time so that all learners see what the other have done and can learn from each other. You do not want their hard work to break! This might also be demoralizing for the learners who spent so much time making it. So perhaps place objects on until you think it will not take anymore
EVALUATE:
Answer the following question on the bridge that you have built after testing it.
Did your bridge work? How many objects did you place on it?
Did your bridge fulfill all the requirements in the specifications given to you?
If you ever had to build this bridge again, what would you do differently?
COMMUNICATE:
An important part of the Design Process is to communicate what you found to others so they can learn from what you did.
Write a paragraph below where you tell Tom about the bridge that you built, what worked and what didn't work, so that he can also learn from what you did.
When we say something is "indigenous" we mean that it occurs naturally in a place. Something that is not indigenous is exotic. We can say certain plants and animals are indigenous to South Africa, such as the lion and elephant and the baobab tree.
We can also talk about indigenous people and indigenous knowledge. This is when we are talking about ideas or knowledge or beliefs that a community of local people has developed over time, and that is specific to the area that they live in.
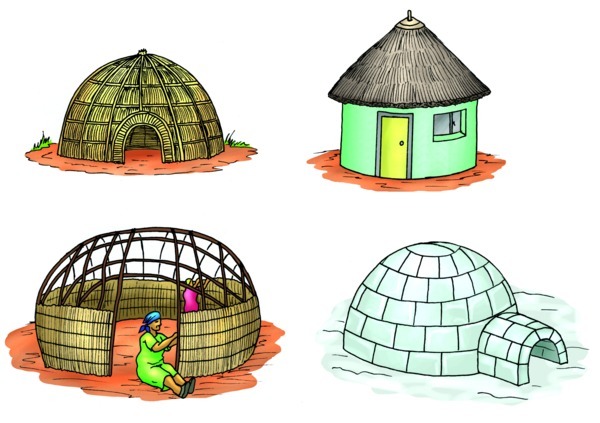
Now, we are going to talk about indigenous structures. This means structures for houses which are built in South Africa by the people that live here.
In South Africa, we have a rich tradition of building homes from the materials available in our environment. Traditional homes have been built the same way for a long time. Today these homes are mainly seen in rural areas. The building materials used are indigenous (grown locally) and the people collect the materials in their environment. Many other cultures also build their own traditional homes from indigenous materials. The Eskimos sometimes even use blocks of ice to build temporary homes they use when they go hunting in the snow and ice!
In South Africa, we have the traditional homes of the Zulu uguqa, the Xhosa rontabile and ungqu-phantsi and the Nama matjiehuis.
INSTRUCTIONS:
|
Traditional homes |
Materials used |
Strut/beam/column |
|
Zulu hut |
||
|
Xhosa rontabile |
||
|
Nama matjieshuis |
||
|
Igloo |
|
Traditional homes |
Shape |
|
Zulu hut |
|
|
Xhosa rontabile |
|
|
Nama matjieshuis |
|
|
Igloo |
The materials used in each hut has specific properties to make it suitable for its use.
|
Materials |
Hard |
Tough |
Stiff |
Flexible |
Strength |
|
|
Zulu hut |
||||||
|
Xhosa rontabile |
||||||
|
Nama matjieshuis |
||||||
|
Igloo |
This is an extension and not included in CAPS, but it forms an interesting activity in which to compare traditional and modern structures and to see how modern structures were influenced by indigenous designs which were developed over hundreds of years.
Today we also have very modern homes. Sometimes the structures of modern homes are based on what was used to build traditional homes. Look at the two structures below. The first ones uses reeds and branches which are bent to make the framework for the house. This is a traditional structure.
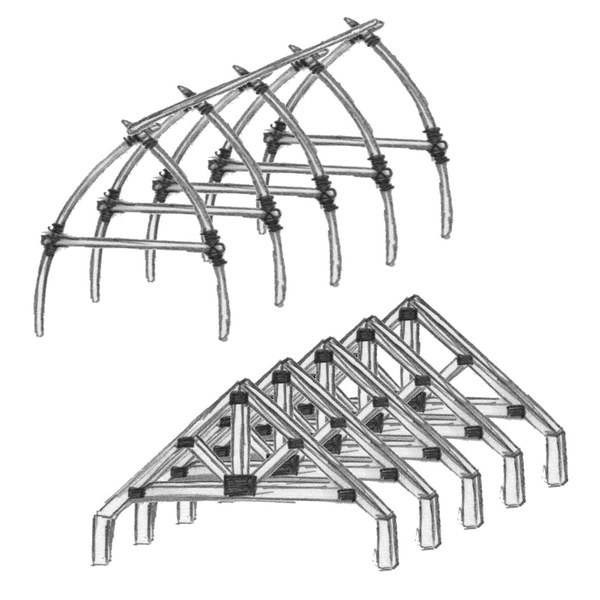
In the second picture, you can see the roof trusses for a modern home. Can you see the similarities between the two? For example, the shape and how the structures are made stronger with struts. There are also some differences. For example, in the traditional house, the reeds and branches are tied together with rope. But in the modern house, the roof trusses are strengthened with gussets.

The advantages and disadvantages of a traditional structure
Give four examples of structures which make use of struts to strengthen the framework.
Bridge, pylon, crane, scaffolding, roof trusses
Why do you think the human rib cage can be considered a frame structure?
This is because it is a frame of ribs, which are like struts, and they protect the internal organs.
Either 4 small corner brace, or 1 or 2 cross-braces from corner to corner.
Give 3 examples of traditional homes in South Africa.
Zulu hut, Xhosa rontabile and ungqu-phantsi and Nama matjiehuis.
What are some of the indigenous materials that traditional homes are made out of?
Reeds, branches, straw, rope

Ienjoyed that!