


Did the whole rocket go to the Moon?
No
There is a strategic reason for placing the unit on rockets here: if we leave this unit to the last 2 weeks of the year, the children will probably not get the experience of doing a technology project. They may just make something in their own time, perhaps at home, and that is not technology. Technology is in the investigating, thinking and designing. You need time to guide them through all those processes.
The NCS pattern of technology projects is in here too. You can remind the learners of this:
I stands for investigating the problem which some people have, investigating existing products, and investigating concepts and skills that you will need to solve the problem.
D stands for Designing - that means using what you learnt from investigations to think of good ways to solve the problem
M stands for Making - when you make your model, you use materials and tools, you make your model look good, and you show the teacher what you learnt in your investigating. (Notice that most children design with their hands, not only with pencil and paper. As they work with materials they get more ideas, and their design improves, so we should think of designing and making as more or less the same stage of a project.)
E stands for Evaluating - after you have made your model to solve the problem, you have to ask, does it work? Could we make a better one?
C stands for Communicating - you must show other people how you decided on your solution to the problem. You need to write and draw your ideas. (The learners should be drawing and writing all through the project. Don't leave the writing to the end, because they find it boring at that stage. When they are getting new ideas they often enjoy writing because they are writing about their own ideas; this is a great strength of technology in school. A technology project gives the children reasons for reading and reasons for writing, and so we can address the literacy problem through the subject of science and technology.)
Jojo, Sophie, Farrah and Tom are watching a fireworks display at a music festival. Rockets shoot up into the dark night sky and then they explode and send out showers of sparks.

Fireworks at the music festival http://www.flickr.com/photos/bayasaa/2693171833/
Jojo asks his friends, "Can one of those rockets go to the Moon?"
Tom replies, "No, the Moon is 384 000 kilometres away - that's too far!"
Farrah says, "I don't want any rockets on the Moon - it's so beautiful the way it is."
Sophie then confirms, "But people HAVE been there! They used a rocket to go there. They walked around and they brought back some Moon rocks."
The Thunderbolts Kids sit for awhile longer, gazing up at the beautiful fireworks with the Moon in the background.
Farrah breaks the silence, "I saw a video of the astronauts on the Moon. They jumped around easily because they weighed less on the Moon."
Jojo then has a great idea, "Come on, let's make model rockets. We'll pretend we are sending someone to the Moon!"
Everyone agrees and Tom even says, "I want a little astronaut on my rocket - I'll write my name, Tom, on him!"
Now the Thunderbolt Kids want to design and make rockets. Their rockets will have a small model of a person on them. You must help them do this!
Write down two things you know about rockets.
They go up into the sky. They move themselves. They go fast. Some rockets carry people. Some rocket have gone to the Moon. Gas or smoke comes out of the back of a rocket.
We now need to write a design brief for our project. A design brief says what you are planning to do and design. It is normally quite short.
Write two sentences about what you are going to do. This is your design brief.
The Thunderbolt Kids must find out some things before they can design a rocket. In this section, the Thunderbolt Kids are going to investigate rockets. In technology, a designer must find out what people have already made, and find out how those things work. We use the word 'investigate', which means find out.
People have used rockets to go into space and to travel to the Moon. In 1969, a rocket called the Apollo 11 took three men to the Moon for the first time. Turn to the page later in the book on 'Moon facts' in the chapter on the Moon to find the pictures and read about the journey.
The task for the learners is to find the information they need. Do not give it to them; they must learn to search through text for information. Give them enough time to search Unit 5 and read the parts they need. You should put non-reading learners together with learners who can read.
Did the whole rocket go to the Moon?
No
Which part of the rocket went to the Moon?
Only the small spacecraft on the nose of the rocket
How far did the spacecraft have to travel to reach the Moon?
384 000 kilometres. Actually it went further than this because it did not go in a straight line. Its path was curved because the Moon was a moving target.
Once we leave the Earth's upper atmosphere, there is no air between there and the Moon. The wings of aeroplanes work only when they move through air.
Can an aeroplane fly to the Moon? Give a reason for your answer.
No, aeroplanes are not designed to fly in a vacuum (where there is no air), so their wings won't work to keep the plane in flight in Space.
Rockets therefore cannot move in space the same way that aeroplanes move through the air on Earth. So rockets need to move in other ways. Let's have a look at making a simple model of a rocket to see how they move.
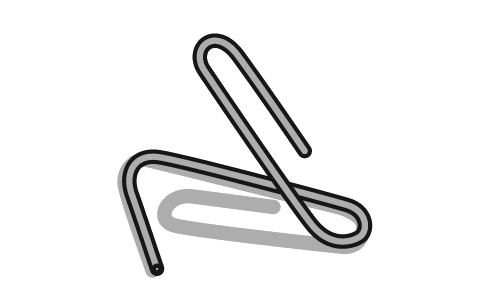
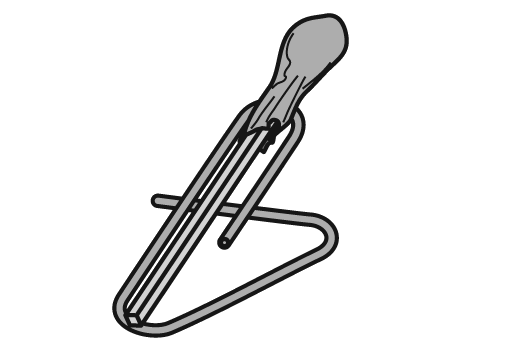
The next activity introduces the learners to the idea of the rocket using gas to propel forwards. The gas combusts and releases from the bottom, moving the foil in the other direction, much in the same way that a rocket does when launching and travelling in space. Explain this to the learners during the activity.
MATERIALS:
INSTRUCTIONS:
QUESTIONS:
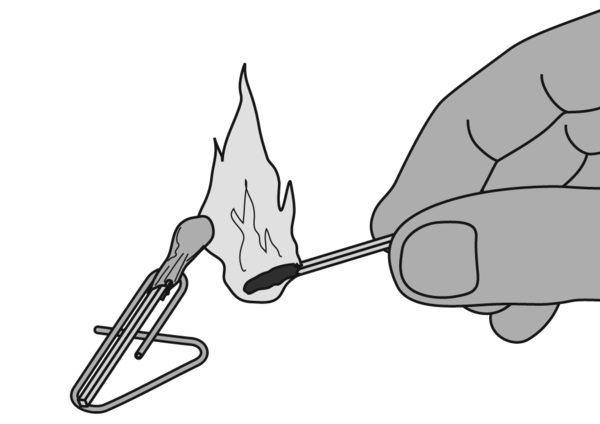
A rocket needs fuel. Fuel stores energy (Remember we learnt about storing Energy in Term 3?). Where is the energy stored in this rocket?
The energy is stored in the head of the match.
So, what have we learnt from this small model of a rocket using a matchstick? When the match-head burns, it gives off hot gases. The hot gases try to expand upwards, sideways and downwards. To expand means to take up more space.
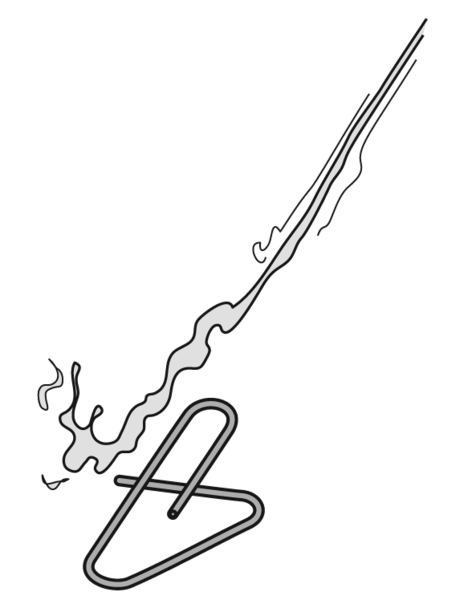
The gases that expands downwards escape from the nozzle at the back of the rocket. The hot gases shoot out from the nozzle and as a result, the rocket is pushed upwards.
Make a drawing of the rocket going up. Add these labels to your drawing: nose of the rocket, tail of the rocket, nozzle, hot gases coming out.
The rocket goes upwards because the hot gases shoot downwards out of the nozzle. The faster the gases go downwards, the faster the rocket goes upwards.
The size of the nozzle can affect how fast the gases come out, and that will affect how fast the rocket is pushed upward. If the nozzle is too big, the gases escape too easily. If the nozzle is too small, the gases cannot get out fast. So what is the best size for the nozzle? You can try different nozzle sizes for the matchstick rocket to find out which one works the best.
What have you learnt from this investigation?
Have you ever blown up a balloon and then let it go. How did it fly? Did it go in a straight line? Probably not! It most likely flew all over the place! This is no good for a rocket. How do we make it fly straight?

MATERIALS:
INSTRUCTIONS:
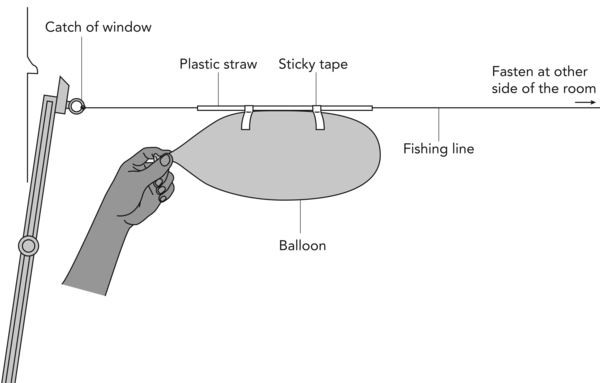
Stretch the fishing line tight.
|
Size of balloon (number of breaths to blow up) |
Distance moved (cm) |
Use this information to now plot a line graph. The number of breaths that you blow the balloon up with is what you are changing, so this goes along the bottom horizontal axis, called the x axis. The distance moved by the balloon along the line depends on how many breaths you blew into the balloon. So this goes along the vertical axis, called the y-axis. Your teacher will help you and show you how to plot the first point. Use the space provided to draw your graph.
QUESTIONS:
Does the balloon move differently when you blow it up to a small size and a big size?
Yes. (In each case it will move along the fishing line, but at different speeds and for different distances.)
What is the difference between the ways the balloon moves when it is blown small and blown big?
When it is blown up big it moves much faster. That is because you have stored more energy in the balloon.
Rockets that take astronauts to the Moon go up, not sideways. Think of a way to make the rocket go up and straight. The following picture will give you some ideas.
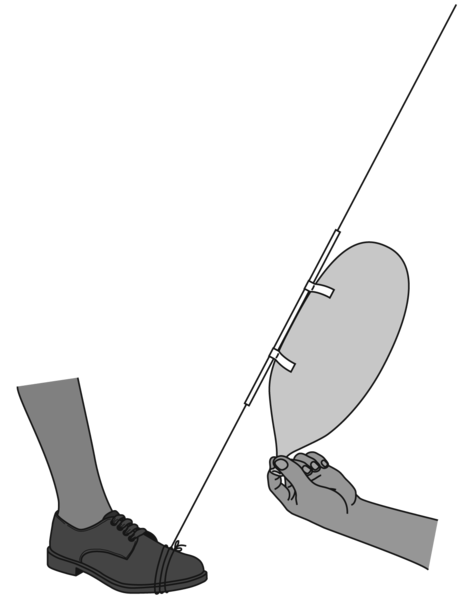
How well does the balloon fly if you hold the fishing line like this?
The next image shows you another way to help the balloon go straight. Make a balloon rocket like that and see if it flies straight.
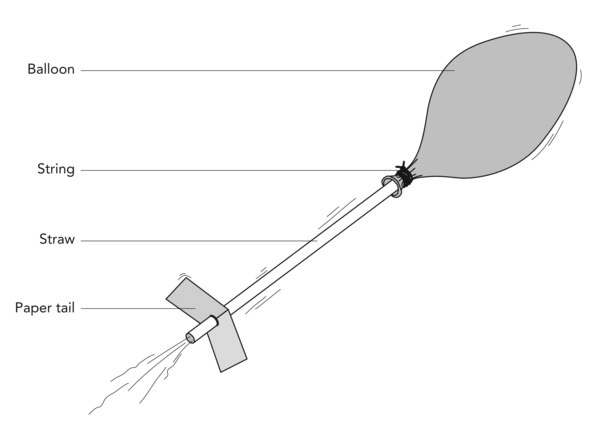
Will this system make the rocket go straight?
So far we have done some investigations into rockets and researched how they move and work. The last thing to do is to investigate a bit about the place we want to go - the Moon!
INSTRUCTIONS:
QUESTIONS:
How far is the Moon from the Earth?
384 000 kilometres
Does the Moon have air for you to breathe?
No
Is there air between the Earth and the Moon?
No
Could a bird fly from the Earth to the Moon? Give a reason for your answer.
The bird needs air to breathe and it will have none in Space. Secondly, a bird's wings work on the air surrounding them, and again, there is no air in Space.
Can a big aeroplane fly to the Moon? Give a reason for your answer.
The engines of an airliner need air to make the fuel burn, and its wings work only when they are rushing through air. There is no air in Space so neither the engines nor the wings would work.
The Thunderbolt Kids are going to design and make rockets. To design means to use your knowledge and to think carefully about the thing you are going to make.
Remember that for primary school children, designing and making go together. They get ideas when they work with materials and they design with the their hands, not only with pencil and paper. As they work, they change their ideas, so we never force them to make something that looks like the first drawing they did. In industry, designers will make sketches and then make a prototype. A prototype is not the final design, they make it to check their design ideas. They will then improve the prototype. Throughout this chapter we have been going through an extended Design Process. In the beginning, we identified a need to design something as the Thunderbolt Kids wanted a rocket to go to the Moon. A short Design Brief was written. We then spent a lot of time doing the Investigation part and other activities formed part of this process. This also shows that science and technology go together and that scientific investigations can be used to make decisions about your design. Now that we have finished investigating, the next section will go into the Design, Make, Evaluate and Communicate parts of the Design Process.
INVESTIGATE:
The first step is to always investigate. We have already done quite a few investigations leading up to this. Go back and revise what you have learnt.
DESIGN:
Now you need to use the information you have found out to come up with a design for your rocket.
Your rocket has the following specifications:
Answer these questions:
What do you need to design?
What will the size and shape of your rocket be?
What materials are you going to use to build your rocket? Make a list of all the materials you will need. The image below shows some of the materials you can use. You do not need to use all of them and you can also use other things that are not in the picture.
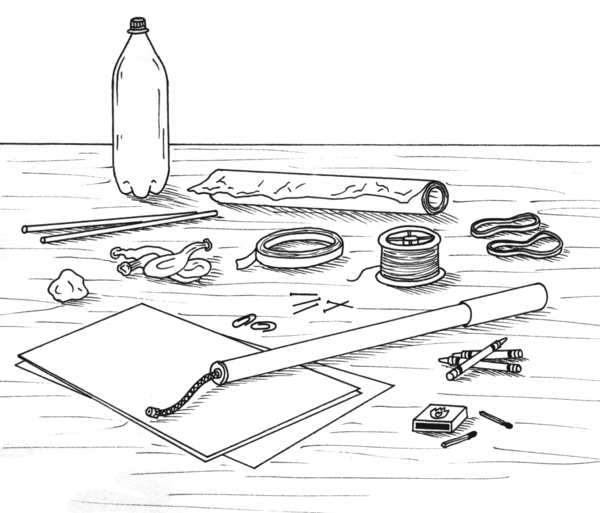
Do not tell learners they may use only certain materials; remember, we want to encourage their creativity. When they get enthusiastic about their projects, they will find all kinds of materials to try. However, we should tell them that anything they bring must be used in class, because we need to assess their design-and-make abilities. Not the abilities of their parents!
What tools are you going to need to make your rocket?

Are there any other specifications and constraints that you can think of for your rocket?
Now you need to draw some designs for your rocket. Use scrap pieces of paper to do your first designs. Once you are happy with your design, use the space provided to draw your design. Label your drawing showing what materials you are going to use for the different parts.
When you are making your rocket you will get better ideas so come back afterwards and draw on the bottom half of the page; show what you really decided to make.
MAKE:
Now make your rocket in class! You have to make your rocket according to your sketch and using the materials you identified.
Once you have all finished making your rockets, test them to see if they go 1m up into the air. Show the class how your rocket moves. The class will ask you how far it goes, and they will look for the little paper astronaut who rides on the rocket. Does anyone's rocket go higher than 1m?!
A lot of facilitation is needed at this point. Maybe only test one rocket at a time so that all learners see what the others have done and can learn from each other.
EVALUATE:
Answer the following question on the rocket that you have built after testing it.
Where did your rocket get its energy from to move?
How many centimetres did your rocket move?
Did your rocket move in a straight line?
What could you have done to make a better rocket?
COMMUNICATE:
Remember, the last part of the Design Process is to communicate what you found to others so they can learn from what you did.
Write a paragraph below where you tell the Thunderbolt Kids about the rocket that you built, what worked and what did not work, so that they can also learn from what you did.

We cannot fly to the Moon in an aeroplane. Give a reason why we cannot.
In Space there is no air. Aeroplane wings work only in air.
Explain how a rocket moves.
Rockets work by pushing hot gases out of the nozzle in the back end. This propels them forward.
Give a reason why the nozzle at the back of the rocket must be small.
The gases must come out very fast.
What year did man first land on the Moon using a rocket?
Man first landed on the Moon in the year 1969.