


What did the flour feel like before it was mixed with the water?
Dry, powdery, soft
Introducing the unit
This unit deals with the many different ways in which materials can be processed. The important messages is that new materials will have new properties, and that processing always has a purpose. We want to change existing materials into new, improved materials, for instance metal (steel) that won't rust like iron does, but has all the other desirable qualities of iron (strength and durability). This unit also lays some of the groundwork for an understanding of Mixtures, which is covered in Gr. 6 Matter and Materials.
When we combine materials, new materials are made. The properties of the new materials are often different from the properties of the materials we started with.
There are many ways to process existing materials into new materials. There are also many reasons why we would need to process materials into new materials.
When we bake a cake, we are processing flour, eggs and other ingredients (that may not taste very nice on their own) into cake which tastes really good!
We process materials to make them stronger, or more durable, or waterproof, or even just to make them look more beautiful or interesting. New materials that form after mixing different materials are sometimes called mixtures.

We are going to have some fun Tom! And at the same time learn about different ways to combine materials.
Process (verb): To process material means to combine or mix it with other materials and/or to change it into something new by subjecting it to one or more processes (heating, cooling, firing, melting, pressurising etc.)
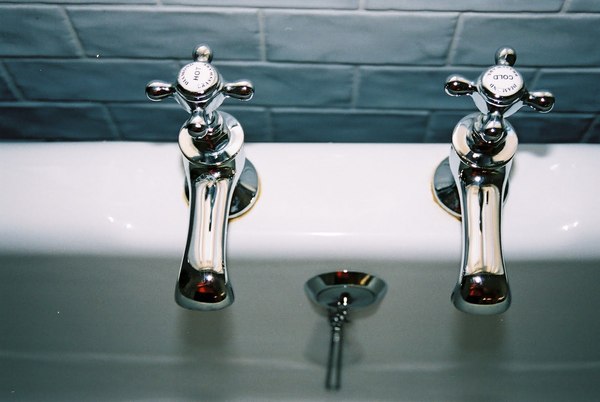
We have learnt that iron rusts over time, and that this process speeds up when the iron is in contact with water. Have you ever noticed rust on the knives and forks in your home? Probably not! That is because they are not made of iron but of stainless steel. But what is stainless steel?
This project is suitable for individuals or pairs of learners. If access to the library or internet is a problem, encyclopedias, books and magazines could be made available in class. The following link may be useful and could be printed for learners: http://encyclopedia.kids.net.au/page/st/Stainless_steel. Learners can complete this project while you carry on with the rest of the activities and content in class.
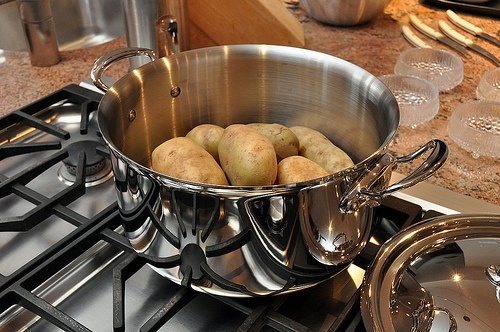
Stainless steel is made by combining iron with other metals to make it stronger and to prevent rust. Processing iron with other metals to turn it into stainless steel means we can use it even in wet environments. Water taps and pipes are sometimes made of steel. Some of the instruments that doctors use to operate on sick people are made of steel, and so are the pots and pans that we use when we prepare food.
INSTRUCTIONS:
Let's look at more ways to combine and process materials.
You do not need to do all the activities in this section, but learners should experience at least 2 different ways to process and mix materials. however, CAPS has allocated 3.5 weeks to this section so you may find that you do have time to do several activities and really let learners experience combining materials in a "hands on" fashion! The order of these activities has been changed slightly from what is suggested in CAPS so that one activity builds on the previous one.
Often, when we mix materials together, the properties of the new material or product is different from the properties of the materials we started with. Do you remember what the word "property" means from the previous chapter when we looked at the properties of metals and non-metals? Let's make some sticky glue to find out about this!
This is a very quick and easy activity to demonstrate the above concept of the finished product having different properties to the starting materials. Place the flour and water in separate bowls and allow learners to put their hands in to describe the properties. It might get a bit messy for learners to each do their own mixing, so you could do it as a demonstration at the front of the class.
MATERIALS:
INSTRUCTIONS
QUESTIONS:
What did the flour feel like before it was mixed with the water?
Dry, powdery, soft
How would you describe the properties of plain water?
Wet, liquid, can pour, fills the container it is placed in, etc
After mixing the flour and water together, what are the properties of the paste that you end up with?
Sticky, wet, more solid than water, etc
Do you remember learning about the states of matter? What state of matter is the flour and what state of matter is the water before mixing?
Flour is a solid, water is a liquid.
What state of matter would you say the paste is?
Dependent on the consistency of the paste that is made - it could be more like a liquid if there is more water, or it could be more like a solid if there is more flour. When the paste dries, it becomes a solid.
Did you get any of the paste you made in this activity on your fingers?! Perhaps it started to dry and become hard? Often when we combine materials together we have to let them set.
Have you ever tasted jelly? Jelly comes in many different colours and flavours. Which is your favourite?
To make jelly, we must dissolve jelly powder in hot water. When the solution of jelly powder in water cools down, something very special happens: The solution sets, and turns into a delightfully wobbly, sweet treat! The jelly powder has been processed into something new! That is what the next activity is all about.
Jelly needs to set overnight in a cool place, and this should be kept in mind when starting this activity. It would be best if the educator handled the hot water, rather than letting the learners do this. Some learners could bring jelly to school and other could bring fruit to slice into the jelly before it sets. It may also be more hygienic to set a small portion of the dry jelly aside for the students to touch and taste, rather than have them dipping their fingers in the powder that will be made into jelly. The jelly could also be set in small yogurt containers or ice cube trays so that each learner can enjoy it the next day!
MATERIALS:
INSTRUCTIONS:
Here are some words that you may find useful. You may also use your own words.
|
liquid, clear, powdery, sweet, sticky, transparent, wobbly, solid, gelatinous (jelly-like), slippery |
Table of observations:
|
Properties |
Dry jelly powder (before mixing) |
Water (before mixing) |
Prepared jelly (after it has set) |
|
What does it look like? |
|||
|
What does it feel like? |
|||
|
What does it taste like? |
QUESTIONS:
Jelly powder, water, fruit (optional).
What happened to the jelly powder when you mixed it with the water?
Learners may write something like: The jelly powder mixed with the water and 'disappeared'.
You could encourage learners to think carefully about using the word 'disappear'. Has the jelly powder actually disappeared, or has it just been changed to a different form? What evidence do we have of it still existing? The jelly powder has coloured the water, which is evidence that it still exists.
Why is the water a different colour?
The jelly powder mixed with the water and this changed the colour of the water.
The following questions could be answered after the jelly has set, preferably the next time the class meets for Science.
How did the jelly mixture change when it cooled down?
The jelly mixture was liquid at first but it became stiff when it cooled.
Try to use as many of the following words as possible in your paragraph:
|
investigation, powder, powdery, sand, water, disappear, colour, change, mixture, stiff |
Learners may write something like: When we started the investigation, the jelly was powdery, like sand. When we mixed it with water, the jelly powder looked as if it disappeared but we knew it was still there because it changed the colour of the water. When the jelly and water mixture cooled down, it became stiff.
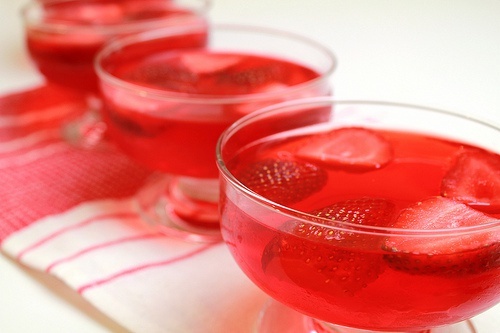
In the picture above, some strawberries have been added to the jelly after it was mixed with the water, but before it was cooled to set. It looks delicious! We could say the strawberries are embedded in the jelly.
The word embedded will be used again later, when the notion of embedding materials in concrete for the purpose of reinforcing it, is introduced. It would be worth spending some time on its explanation here.
In the previous activity we saw that jelly sets. Jelly is not the only material that sets. We are going to investigate another material that sets shortly.
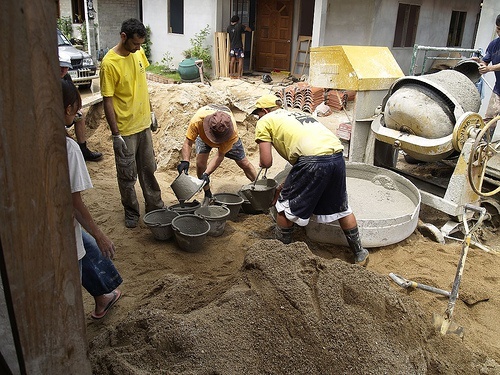
Have you ever watched builders mix concrete when they want to build a wall or a house? Look at the people in the pictures below. What are they doing?
The people in the pictures are mixing sand and water with building cement. The mixture of sand, water and cement is called concrete. Concrete is like mud when it is wet, but when it dries out it sets into a hard, strong material. Concrete can be used to make bricks and pavements and to plaster walls.
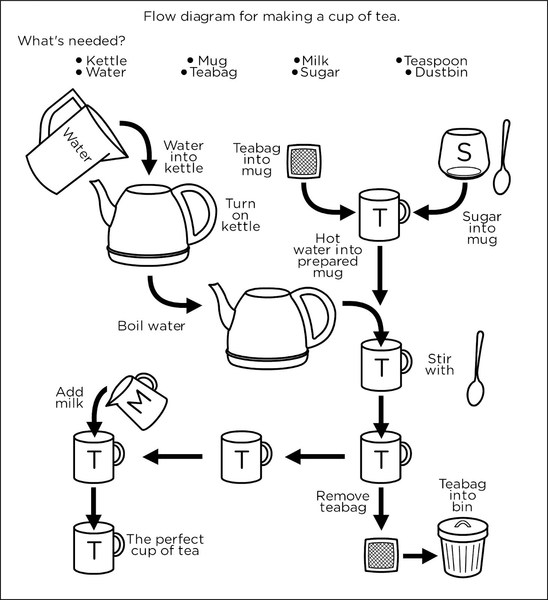
In the first picture people are using spades to mix the concrete. They are using the spades like we would use a spoon to stir sugar into a cup of tea. The people are using their muscles to do the work required for mixing the concrete.
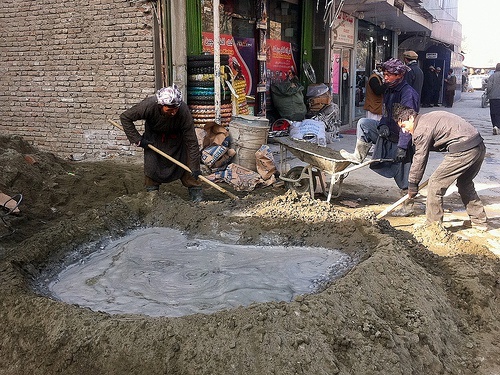
Here you could link to other areas in the curriculum related to Energy and Change, and Life and Living.
In the second picture the machine on the right is called a cement mixer. This machine mixes all the ingredients by turning mechanically, like an electric food mixer. Electrical energy does the work required for mixing the concrete.

In the next activity we are going to make some bricks, using sand and water and some plaster of Paris (a material that is very similar to cement).
MATERIALS:
INSTRUCTIONS:
Look at all the starting materials and feel them with your fingers. Write their properties in the table below. Do NOT taste any of them! (Tasting is ONLY for food.)
|
Properties |
Plaster of Paris |
Sand |
Water |
|
What does it look like? |
|||
|
What does it feel like? |
Making sand bricks:
Do you think they will be strong and durable?
Making 'concrete' bricks:
Plaster of Paris sets quickly and gives off a considerable amount of heat in the process. Ensure that learners take note of the observation that the mixture becomes warm when it sets. Help them to formulate their ideas around this by asking questions like: "Why does the mixture get warm?" and "When do things get warm?" You want them to realise that things feel warm when they release energy/heat. When mixing, the plaster of Paris and sand need to be in a 1:2 ratio.
When these bricks are dry, they will be 'concrete' bricks. Do you think they will be strong and durable?
|
Properties |
Wet sand |
Sand brick |
Wet 'concrete' |
'Concrete' brick |
|
What does it look like? |
||||
|
What does it feel like? |
||||
|
Is it strong and durable? (Yes or No) |
QUESTIONS:
What materials did you start with?
Sand, plaster of Paris and water.
How did the 'concrete' mixture feel after you mixed it? Did it get warmer or colder?
The mixture felt warmer.
Encourage learners to think in terms of the concept of temperature: "That means the temperature was higher (increased)".
Where do you think the heat came from?
Learners might say: "From the starting materials".
Teacher note: This is an opportunity to get learners to realise that when materials are mixed, they sometimes change.
You could then ask: "Did the starting materials feel warm?" to which learners should respond: "No."
Then: "When did it start to feel warm?" .. "When the materials were mixed."
"What do you think happened when the materials were mixed that caused them to get warm?" Some learners may now begin to use words like "react" or "reaction". You could then bring in that energy is released by the starting materials reacting with each other. We observe this energy by the heat/warmth that we feel.
Do you think that sand and water alone would be good material for making bricks? Say why (or why not).
If the sand bricks were weak and easily crushed learners may respond: Sand and water is not a good material because the bricks will not be strong enough.
Did adding plaster of Paris to the sand make the bricks better? In what way?
Teacher note: Here it is important to convey the idea that the plaster of Paris acts as binder to hold the sand grains together.
The sand and plaster of Paris bricks should turn out stronger than the bricks made of sand alone, and therefore learners may respond: The bricks made of sand and plaster of Paris were stronger than the sand bricks.
Can you think of other materials that we could add to the mixture of sand and plaster of Paris to make the bricks even stronger and tougher?
Here you could allow the learners to use their imaginations: Some materials that may be mentioned are: cement, stones, rocks, etc. This question is an ideal opener for introducing the concept of reinforcement. You could use the meaning of the word 'force' to conjure up notions of 'strength' and making things 'stronger'.
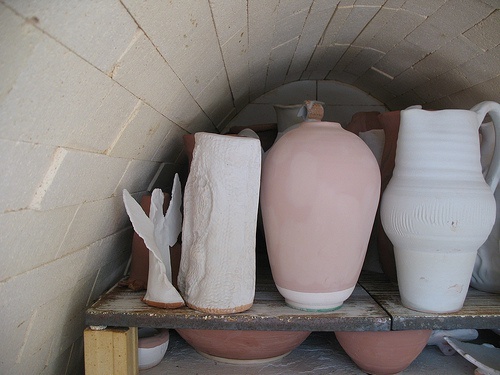
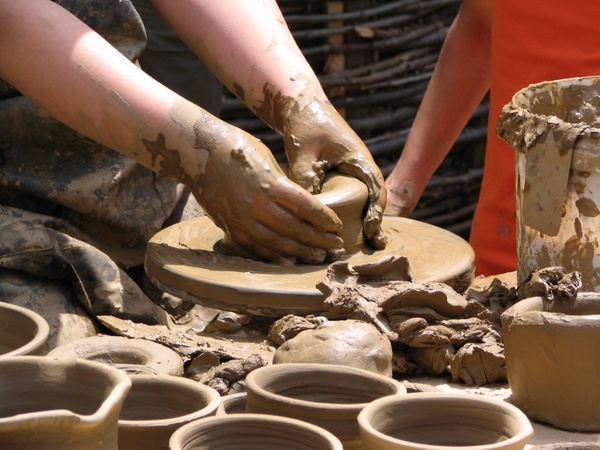
Real bricks are actually made by firing the bricks in a special oven called a kiln to bake them and make them hard. A potter is someone who makes objects such as pots out of wet clay. Once they have dried and have been fired, the clay becomes hard.
We have learnt that we can make materials stronger if we add other materials to them. When we make certain materials stronger by adding other materials, we say we are reinforcing it. In the activity you have just completed the bricks made of 'concrete' (sand and plaster of Paris mixture) was stronger than the bricks made of sand only. The plaster of Paris acted as binder to glue the sand grains together.
In the next activity we will be looking at pictures showing examples of how concrete can be reinforced. There will be some questions to help you think about each process.
INSTRUCTIONS:
Look at the picture of a piece of concrete wall below.
The concrete looks as if there are pebbles (small stones) embedded in it.
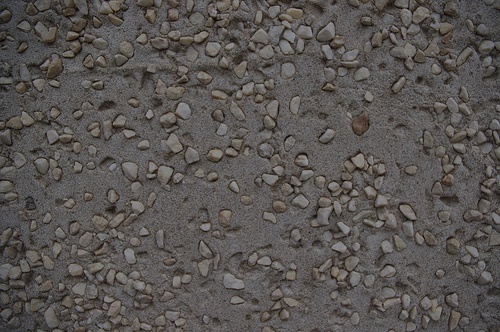
How did the stones get inside the concrete?
The stones were mixed into the concrete when it was still wet.
Why do you think the concrete was mixed with stones? (Hint: Is stone a strong material?)
The stones were mixed into the concrete to make it stronger. (Here you may want to encourage the use of the word 'reinforce'.)
What is the process called when we make a material stronger by mixing it with another material?
Reinforcing.
Look at the picture below. It shows how a floor is being prepared for reinforcement with steel bars.
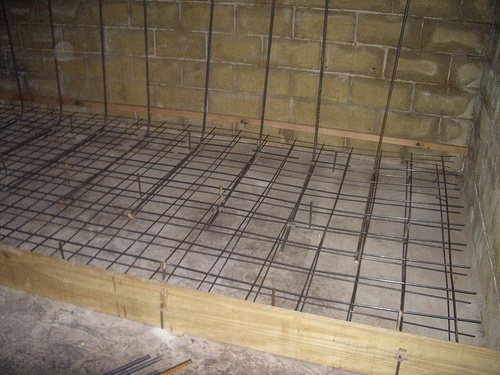
The floor in the picture is inside a garage. Why do you think the concrete needs to be reinforced with steel bars? (Hint: Why would the garage floor need to be extra strong?)
The floor needs to be strong because the garage may be used to store a car or a truck or heavy equipment.
The next picture shows a new building that is being constructed.
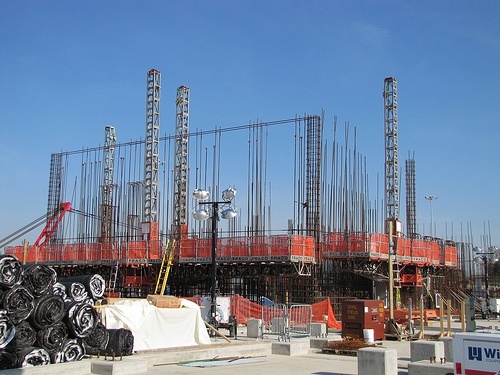
The steel bars are there to reinforce the walls.
(The purpose of buildings are to protect people and things. This looks like it might be large building, meant for holding many people and things, like equipment, computers and furniture.) Learners may write: The building needs to be extra strong to protect the people and the things, and to be stable enough to stay in one piece and not fall apart.
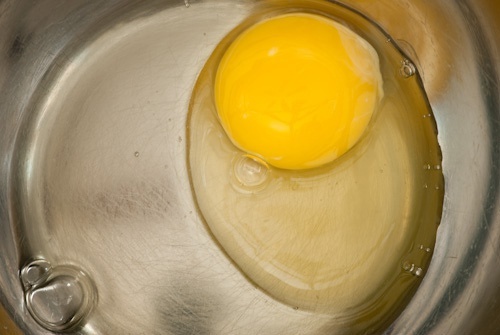
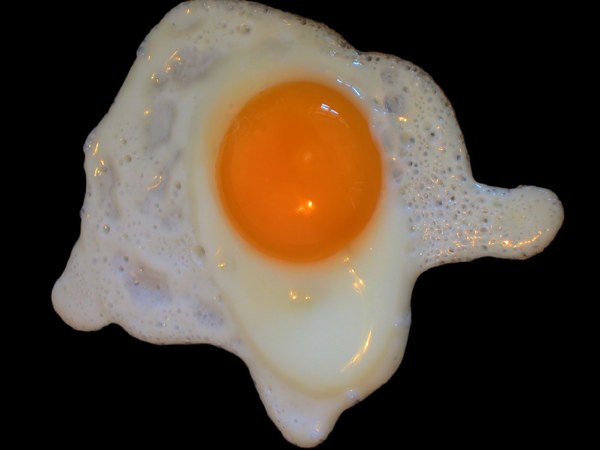
Cooking food is also a form of processing. Have you ever seen what a raw egg looks like? The same egg looks quite different when it is cooked. Notice how the egg white is transparent when it is raw, and white when it is cooked. When it is raw, the egg is runny, like liquid. When it is cooked, the egg is solid but soft like rubber or soft plastic. Look at the pictures below.
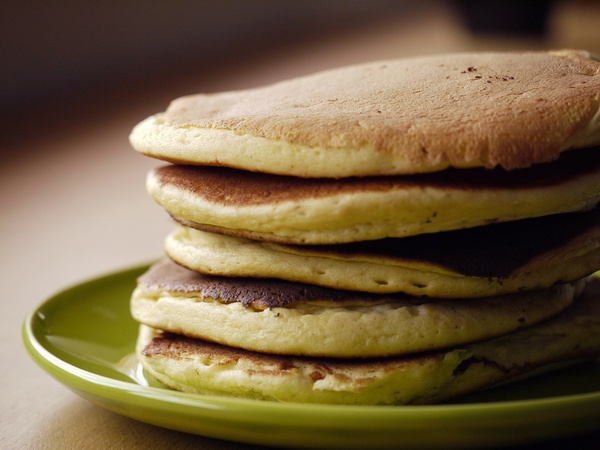
In the next activity we will be cooking some flapjacks. They are like pancakes but smaller and thicker. We will be comparing how the raw ingredients change when they are first mixed, and then cooked.

MATERIALS (In this case, ingredients and cooking apparatus!):
INSTRUCTIONS:
Do not use words like good, bad, tasty, funny or weird! The block below contains some descriptive words that you could use:
|
powdery, fizzy, sweet, salty, tasteless, sandy, crunchy, oily, smooth, liquid, milky, slippery, dry, grainy, bitter, frothy, runny |
|
Properties |
Uncooked batter |
Cooked flapjack |
|
What does it look like? |
||
|
What does it feel like? |
||
|
What does it taste like? |
QUESTIONS:
Starting materials
|
flour |
sugar |
eggs |
melted butter |
|
baking powder |
salt |
milk |
cooking oil |
Learners might write: The batter was runny and a pale creamy colour when it was raw, and it was stiff and pale brown, with dark brown edges when it was cooked. Before it was cooked, the batter tasted sweet and raw (floury), but after it was cooked it tasted like cake. Before it was cooked the batter felt cold, slippery and liquid, but after it was cooked it felt warm, soft and rubbery.

Great idea Tom, your friends will love that! But do you know how much batter you will need to make?
The purpose of this activity is for learners to develop an understanding that the amount of new material we can make is directly influenced by the amount of starting material we have.
Tom is making flapjacks for his friends, Sophie, Farrah and Jojo. He uses the recipe in the previous activity. He is very careful not to waste any of the batter. When all the batter is finished, he counts the number of flapjacks he has made. There are 12 large flapjacks. He is very pleased with himself because it means each one of them can have 3 large flapjacks.
QUESTIONS:
How many flapjacks could Tom make if he used only half of the batter?
Tom could only make 6 large flapjacks if he used half of the batter.
Tom decides to invite 4 more friends to eat flapjacks. That means there will be 8 people in total. How many flapjacks would he need to make if each person eats 3 flapjacks?
Tom would need to make 24 flapjacks (3 x 8 = 24).
|
Ingredients |
Amount needed for 12 flapjacks |
Amount needed for 24 flapjacks |
|
Flour |
2cups |
4 cups |
|
Baking powder |
21/2 teaspoons |
5 teaspoons |
|
Sugar |
3tablespoons |
6 tablespoons |
|
Salt |
1/2 teaspoon |
1 teaspoon |
|
Eggs |
2 |
4 |
|
Milk |
11/2 cups |
3 cups |
|
Melted butter |
2tablespoons |
4 tablespoons |
In the next section the ideas that were developed around preparing (processing) food are extended to other contexts. It may be useful to link the new ideas back to the examples of food processing, because these are closer to learners' everyday experiences.
List three reasons why we process materials.
We process materials to make them stronger, more durable, waterproof, fire-resistant, more beautiful (any sensible reason is correct).
Tea, coffee or any beverage, salt water, sugar water or any other sensible example.
What is stainless steel?
Stainless steel is iron mixed with other metals to make it strong and to prevent rust.
|
Picture 1 |
Picture 2 |
 |
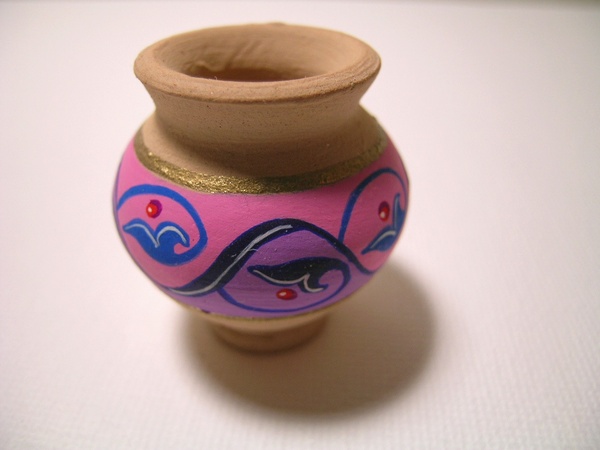 |
In Picture 1 the clay is wet and soft. It has been mixed with some water so it can be moulded. In Picture 2 the clay is hard and dry. But it is also brittle as if you drop it on the floor it will smash. To get from the clay in Picture 1 to the pot in Picture 2, the clay was moulded into a specific shape and then left to dry. After drying it was fired in a kiln to bake it and make it set. It was also painted at the end.
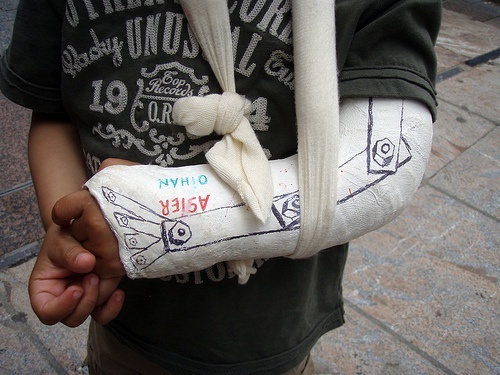
A cast is normally made of plaster of Paris as when it is wet and the powder is first mixed with water, it is soft and can be moulded onto the arm and fit the shape of the arm. However, when the plaster of Paris dries and sets it becomes very hard and strong. This is useful as the cast needs to protect the broken arm and hold it still until the bones have mended.
Bricks are made by shaping the clay into rectangle shapes and then firing them in a kiln. What are the properties of bricks after firing? Name a few places where bricks are used.
Bricks are hard and durable meaning they will build strong houses. Bricks are used to build houses and other buildings such as schools, shops, etc. Bricks could also be used to make a path or floor or driveway.